Penn-CNB Administrator Manual
The Penn Computerized Neurocognitive Battery (Penn-CNB) is a web application tool to assess cognitive function. The battery measures performance accuracy and speed on specific neurobehavioral domains using tests that were previously validated with functional neuroimaging. The Penn-CNB is administered using standardized procedures to ensure data are consistently and accurately collected. This does not mean the participant gets all the questions right, but that the participant is trying their best throughout the entire testing session while receiving a standard administration. This manual describes the procedures that CNB Administrators should follow when administering a CNB battery. All administrators must carefully read this manual prior to administering any CNB assessment.
General
1.1 Responsibilities of the CNB Administrator
The CNB Administrator, who can be an investigator, staff, coordinator, or research assistant at a university or research institution, is ultimately responsible for providing a standardized CNB administration.
CNB Administrators must:
• Complete training on standardized test administration (for more information on training, click here).
• Read the Penn-CNB Administrator Manual carefully.
• Administer and review their project’s battery themselves at least twice before actual administration.
• Supervise/proctor administration at all times.
1.2 HIPAA Compliance
The CNB is used for human subjects research. Thus, all investigators or users of the CNB administering the battery virtually, must use a health information (HIPAA)-compliant videoconferencing system. For Penn Medicine administrators, Zoom is currently the HIPAA-compliant videoconferencing platform. For all assessments, login to: https://pennmedicine.zoom.us.
1.3 Resources for the CNB Administrator
You can administer batteries, view results, and access all documentation through our website: https://webcnp.med.upenn.edu.

1. About the CNB
a. This page provides general information about the CNB, relevant publications, and contact information.
2. Assessments
a. Home: Access the assessments home page, which provides access to all features below (b-f).
b. New Assessment: Start administering a battery. You can also initiate a battery by clicking on the “Start Testing” button in the page displayed above.
c. Assessment History: See an overview of your previously administered sessions.
d. ProctTrack: Access the ProcTrack page (click here for more information). This is only accessible by paid users!
e. Edit: Access the Edit sessions page, where you can edit Subject ID, Visit ID, Family ID, Local ID, BBL ID (penn-use only), Age, Birth Year, Sex, Gender Identity, Handedness, Education, Parental Education, Assessment Type and if session is excluded. This is only accessible by paid users!
f. Validate: Validate testing sessions.
3. View Data
a. Reports & Norm Data: Export summary scores and norms
b. Raw Data: View raw data.
4. Explore Tests
a. View the tasks included in the standard CNB battery as well as additional tests offered.
5. Resources
a. Administrator Manual: This SOP should be thoroughly reviewed by all trainees and assessors.
b. Training Procedures: This page outlines the CNB training steps.
c. CNB Translations: Shows the languages in which the CNB has been translated as well as the procedures to translate a battery.
6. Help
a. You can submit a question or request for help through Zendesk by clicking on this button.
7. Request Account
a. You can request a CNB account through Zendesk by clicking on this button.
CNB Pre-Testing Policies & Guidelines
2.1 CNB Battery Setup
There are two ways a CNB battery can be setup:
1. By logging into your WebCNB account and registering a new assessment session.
2. Using “local laptops” specially configured by the CNB team.
1. Logging into WebCNB
You can login at https://webcnp.med.upenn.edu by clicking “Log in” at the top right-hand side of the screen. See below for more information.
Survey Link
This is a link created upon registering a new assessment and can be used to administer the CNB battery. It can be generated “on the fly” without the direct intervention of the Penn CNB team. Each link is created based on a specific battery, site, and subject ID. Although assessments are usually initiated immediately after registration, each and every session is connected to a link on the back end. See below for more information.
Assessment Types
There are different ways to utilize a link to administer the CNB (as will be reviewed later in the manual) depending on your assessment type. There are generally 4 types of assessments:
• In-Person Proctored: For this type of assessment, the participant will be coming in-person to the lab and you will be administering the CNB right next to them, in the same room.
• Remote Proctored: The assessor and the participant are in separate rooms for this assessment type. This could be either that the participant is in their private space or that they have come to the lab but they are in a different assessment room from the assessor.
• Self-Administered: Monitored.
• Unproctored/Self-Administered: The participant completes the assessment independently without the presence of the assessor. You will have sent the participant a link in advance.
2. Local Laptops
While CNB administration typically requires Internet connection, it is possible to run a session without it using laptops that have been specially configured by the Penn CNB team (“local laptops”). During offline administration, data are stored locally on the laptop. As you are collecting data, it is important to upload them to the server periodically.
I. Reconcile
“Reconcile” is the process that migrates your online WebCNP (https://webcnp.med.upenn.edu) account permissions and access to the Local WebCNP computer. If you are using more than one Local WebCNP computer as part of a project, EACH computer will need to be “reconciled” to transfer the permissions of your online account to that computer. >Reconciling requires an active internet connection.
Important! Reconciling basically creates a copy of the online server to the local computer. This must be done with extreme caution because potential updates to the online server that may be irrelevant to your study, could get transferred to the local computer via reconciling and potentially cause malfunctions. This is why the Penn CNB team will send the computers already reconciled with your accounts. You will NOT have to reconcile once you receive the laptops. If you ever need to reconcile, please contact the CNB team (or the CNB team will let you know if reconciliation is needed). Just in case, we are including instructions on reconciling below.
1. To reconcile your laptop’s localhost server with the WebCNP server, begin by opening your browser (preferably Chrome, but Safari and Firefox also work) and pasting this link to the URL bar: localhost/reconcile_db.pl

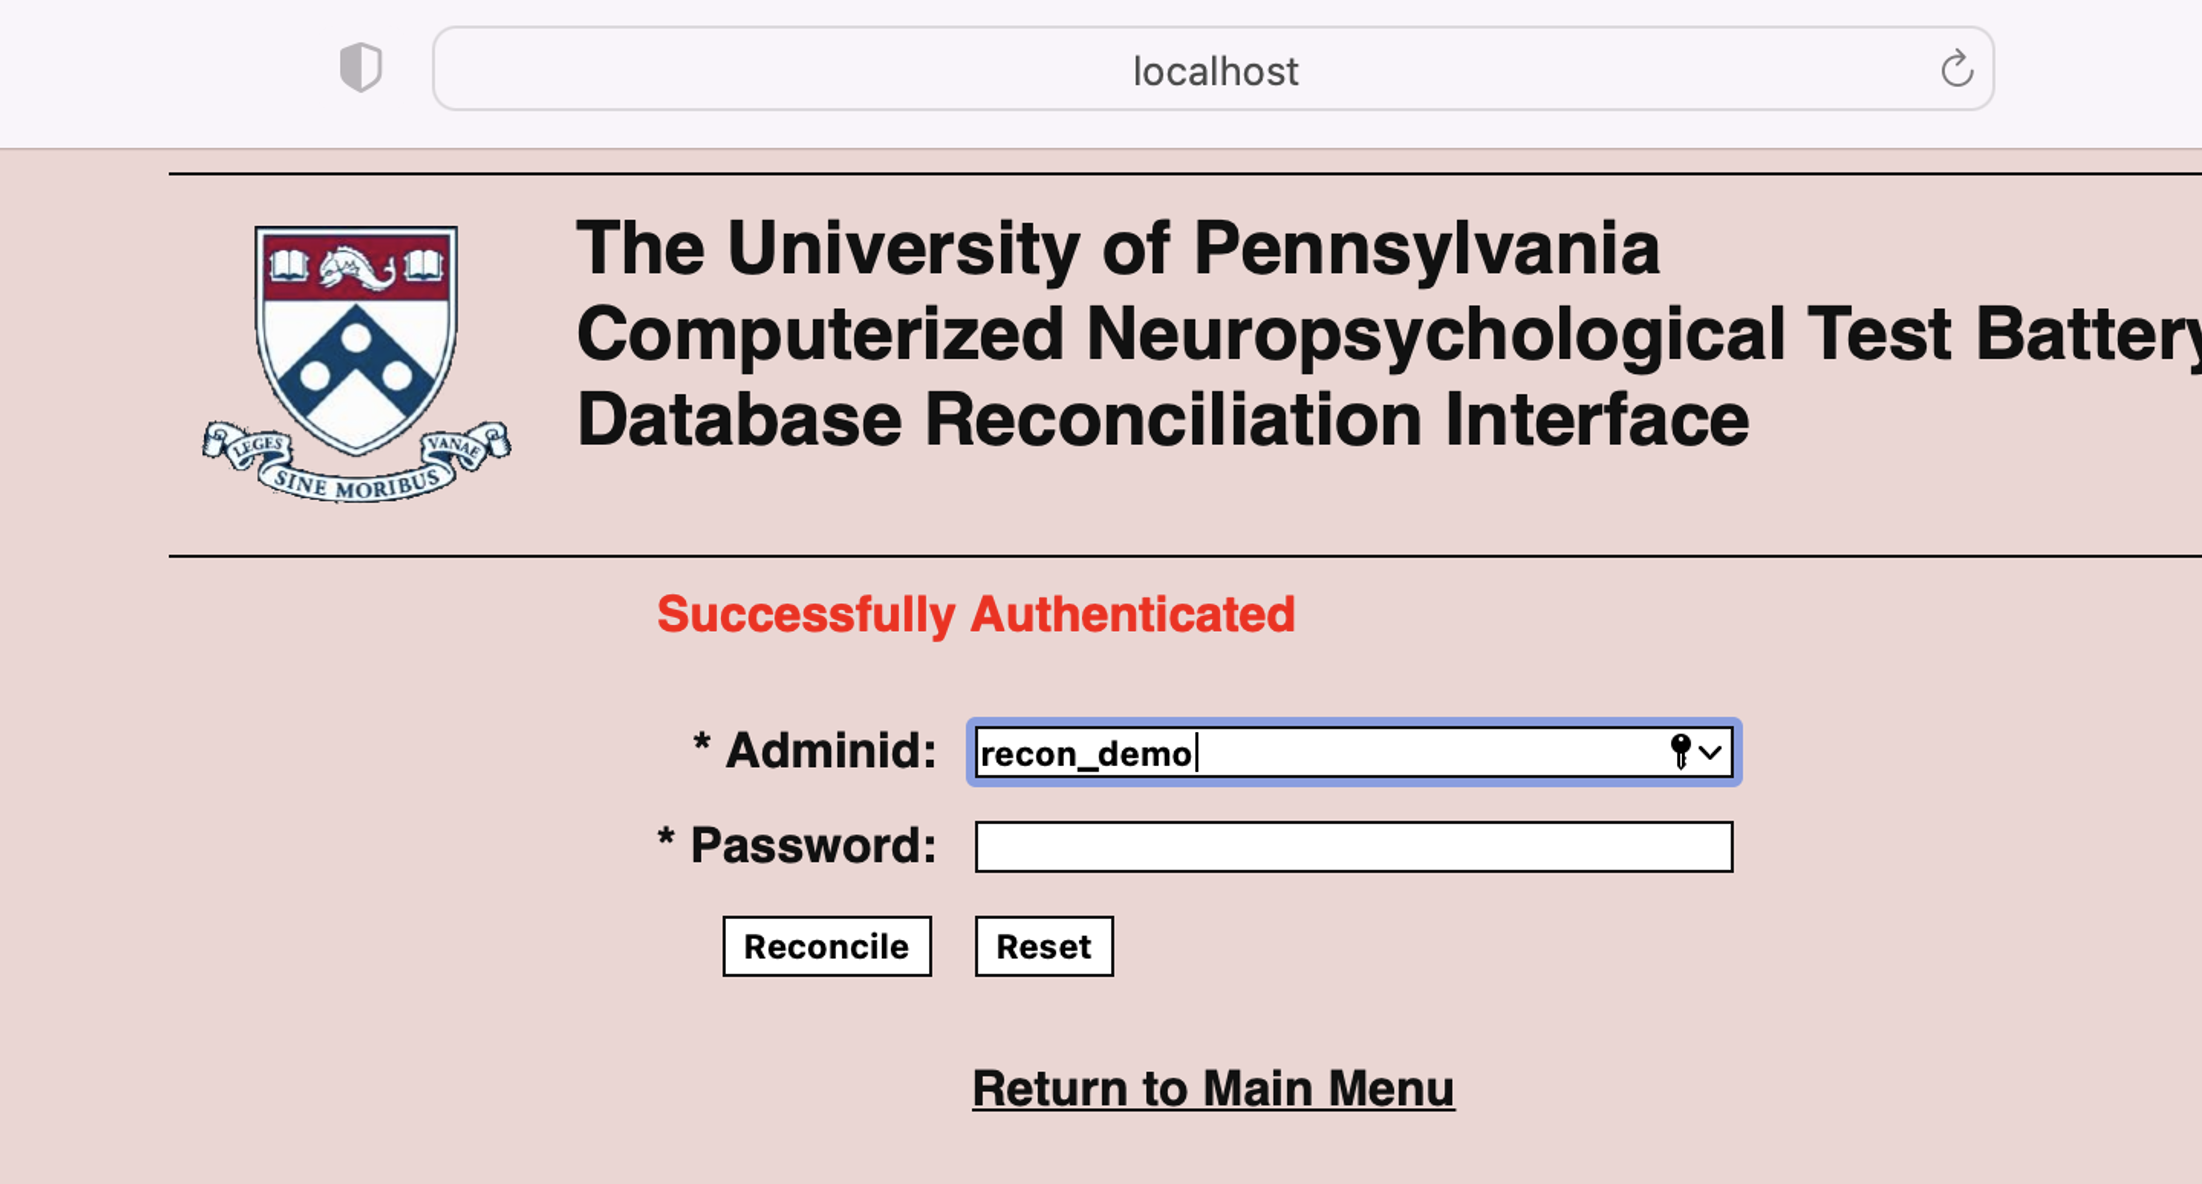
2. Enter a valid Adminid and Password, and click “Authenticate.”
3. The page will reload and the adminid field will autopopulate with your username. Enter your password again and click “Reconcile”.
4. You should see a message in blue font confirming the successful reconciliation of your computer’s localhost with WebCNP (in blue text). This step might take a few seconds to load.
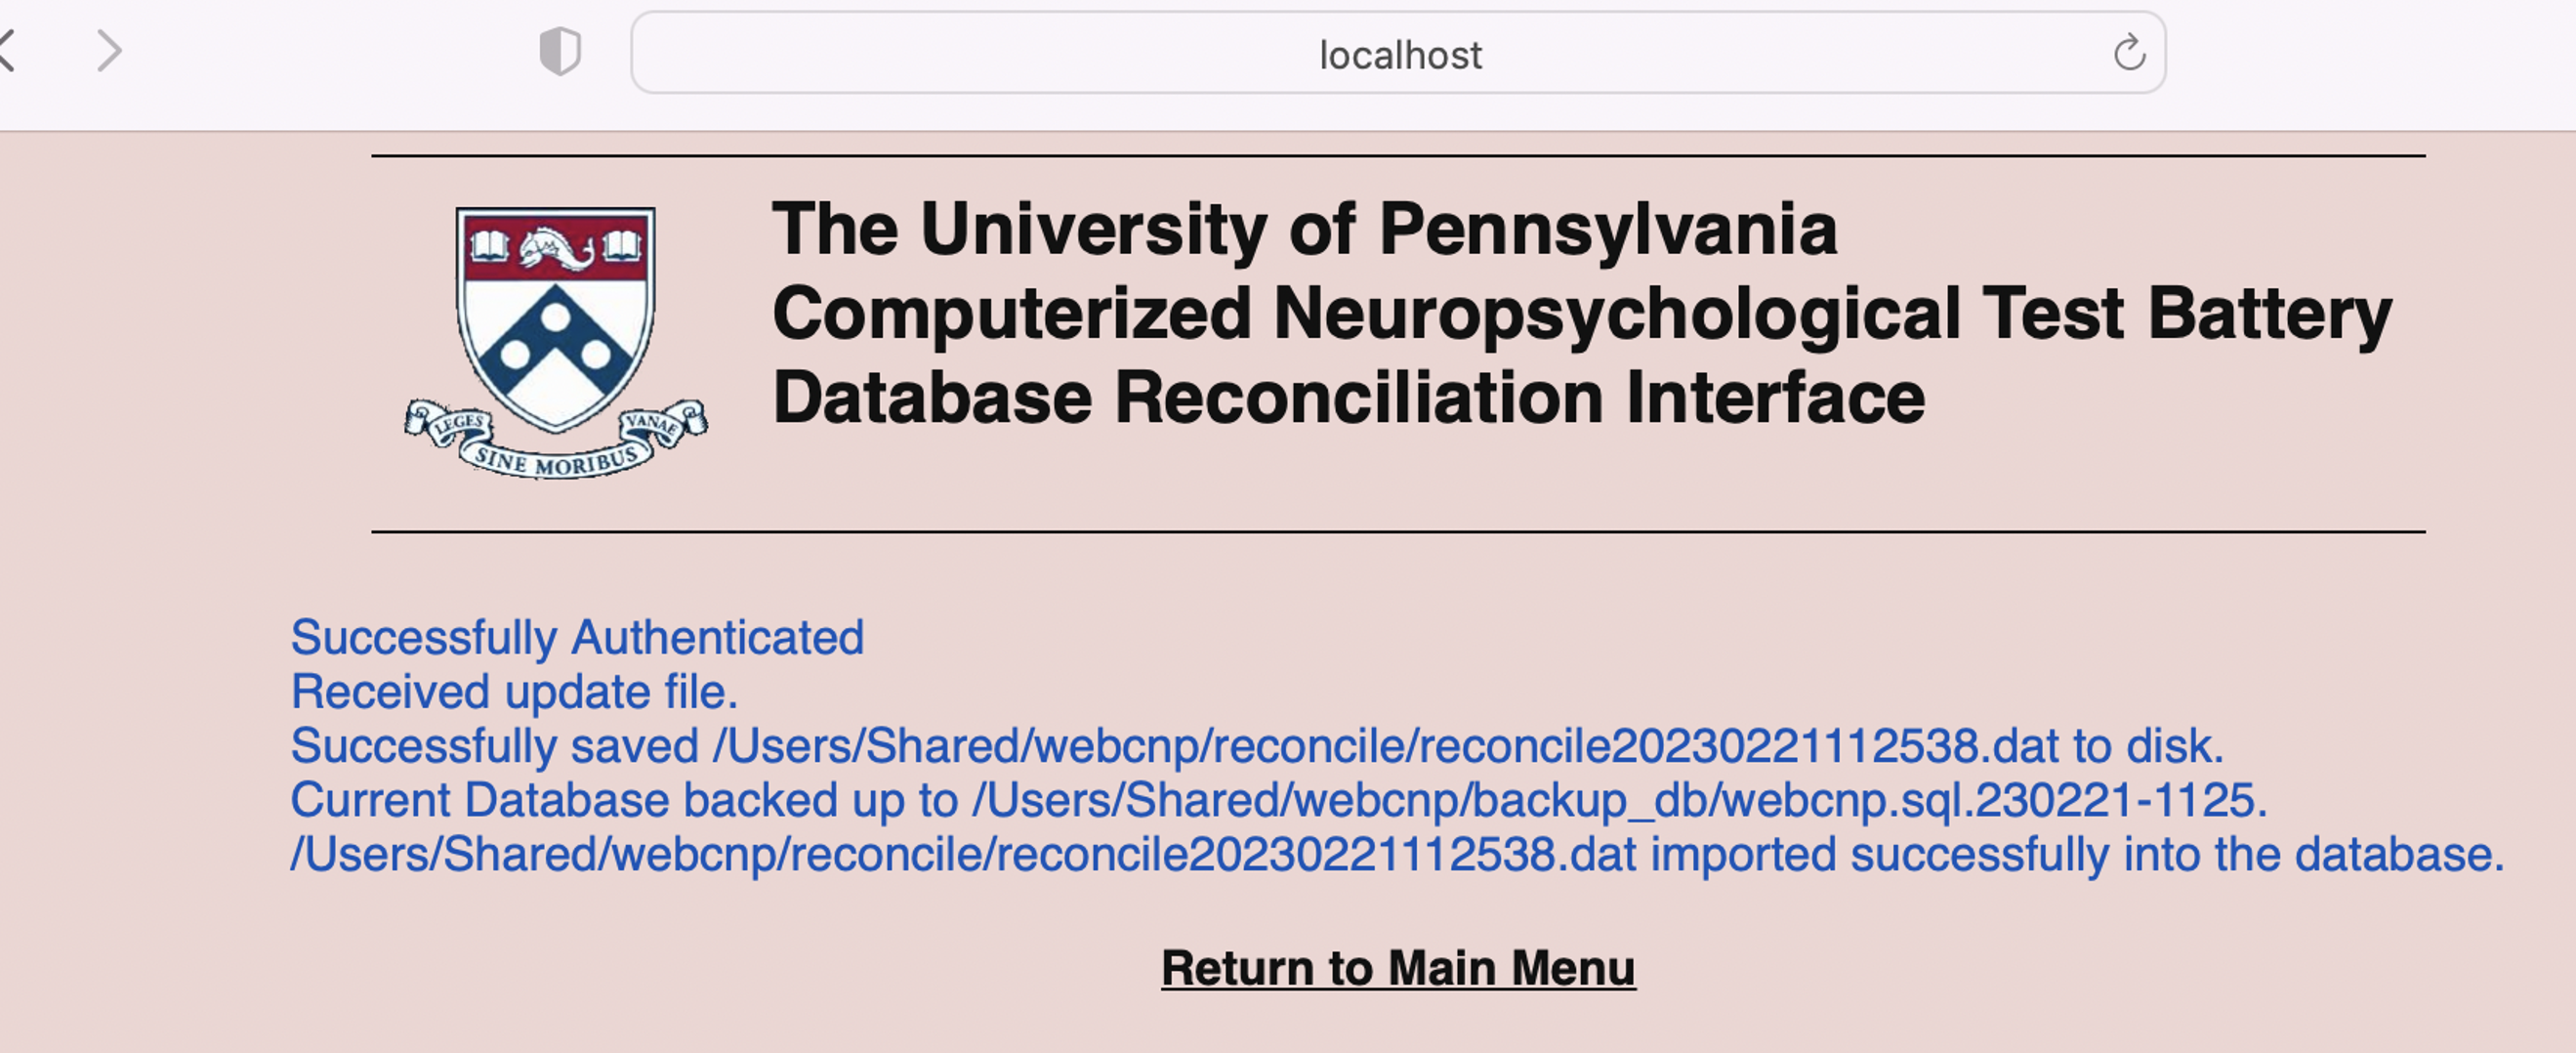
5. When you have successfully completed the “Reconcile” process (blue text), you can click “Return to Main Menu” and you are ready to administer a WebCNP battery. Click “Start Testing” to start administering your battery.
Note: to administer a battery any other time afterwards, login in the coordinator user, open your browser, and type “local host”. Log in with your admin ID and password.
II. Uploading
“Upload” is the inverse process of reconcile, in that instead of migrating information from your online account to the computer, you are now pushing information (completed WebCNP batteries) from the laptop to the online WebCNP server (https://webcnp.med.upenn.edu). If you are using more than one Local WebCNP computer as part of a project, EACH computer will need to be “uploaded” daily to transfer the completed WebCNP battery data to the online WebCNP platform. You will need an active internet connection in order to Upload the data. Although it’s advisable to upload your sessions daily, you can do so periodically at your team’s discretion (e.g., weekly), depending on the number of participants you run each week.
All users should use this REDCap form to upload their files: https://redcap.med.upenn.edu/surveys/?s=9T98HPX3WC9JC4R3. The form includes a copy of the uploading manual, which is also pasted below.

This form is to be used for all Local Laptops as a temporary solution to ensure all data have been synced to the CNB server. Each "Upload file" field below should be used for data exported from an individual session. You can upload up to 6 sessions at a time. To export data and upload the exported file, please follow the steps below:
1. From the WebCNPTM localhost Main Menu, select "Upload Sessions." (if that isn't an option go to localhost/ upload_sessions2.pl). Enter valid Administrator ID and Password.
a. Ensure you are connected to the WiFi.

2. From the tab list on the next screen, select "Upload Sessions."

3. Fill out the appropriate fields that will retrieve the batteries you wish to upload. Make sure to check the box "Include Incomplete Batteries" on the left-hand side. Click on "List Session(s)." Your collected sessions should now appear at a table at the bottom of the page.

4. From the left-hand side of the table, check the sessions you wish to upload, and click "Upload Selected Sessions."

5. A screen will appear confirming the batteries you have selected to upload. If all of the batteries listed are the batteries you wish to upload, select "Confirm Selected Sessions."
6) The file path where the sessions have been saved will appear in red text. You do NOT need to add your password and confirm sessions!! You are done with the localhost page.

7) Locate the newly exported files on your laptop, following the file path: /Users/Shared/webcnp/uploads.
a. This folder will contain all the sessions previously exported, not just the new ones! It is important to double check and locate the newly exported sessions!
b. The file name includes a long number followed by underscore ("_") and the CNB username of the user who exported the data. For example, if user ezoupou exported the data on 3/22/24 at 08:24:35, the file name would be '2403220824350_ezoupou'.

8. Open the REDCap upload form: https://redcap.med.upenn.edu/surveys/?s=9T98HPX3WC9JC4R3.
9. Enter your CNB username.
10. Click "Upload file" and then "choose file" from the pop-up window:

11. Choose your file from the 'uploads' folder (path: Users/Shared/webcnp/uploads) and click 'Upload'. Make sure the date corresponds to the correct file you wish to upload!
12. Then, click on 'Upload file".
13. Upload each file separately. You can upload up to 6 files at a time. If you have collected more participants, submit a new form.
14. Submit the REDCap form.
a) This form basically sends the data to the CNB team. The team uploads the files to the online WebCNB server weekly on Fridays. If you cannot see your sessions on the online server within a week from uploaded, please contact the CNB team.
III. Database Backup
You can also use the REDCap form above to back-up your data following the steps below. Data do not need to be backed up every time you upload sessions! Back-ups can be done a couple of times per year. However, it’s important that backups are routinely performed, so that the team maintains a copy, just in case.
1. From the "Upload Sessions" menu, select Backup Database and then press on the button that appears.

2. The file path where the backup file has been saved will appear in red text.

a. Note: the file name is always "webcnp.sql.[date]-[time]".
3. Scroll to the end of the REDCap form, and click "Select Files".

4. Go to the "backup_db" folder and locate your backup file. Then click "upload".

2. Click on the blue box "Submit" (see #1 in image below) to upload the file on Box, and then click on the grey "Submit" button (see #2 in image below) to submit the overall REDCap form.

2.2 Computer/Equipment Setup
The minimum requirements needed for a participant to complete the CNB include:
• A desktop or laptop computer
• Cookies enabled on their web browser.
• ProctTrack access (digital or printed form)
• If administering remotely: Video Conferencing application enabled on participant’s and assessor’s computer.
While not a requirement, we strongly recommend the participant complete the CNB on Mozilla Firefox, Google Chrome, Safari, or Microsoft Edge. Please note, participants may NOT use tablets or smartphones to complete the Virtual CNB.
Zoom Settings
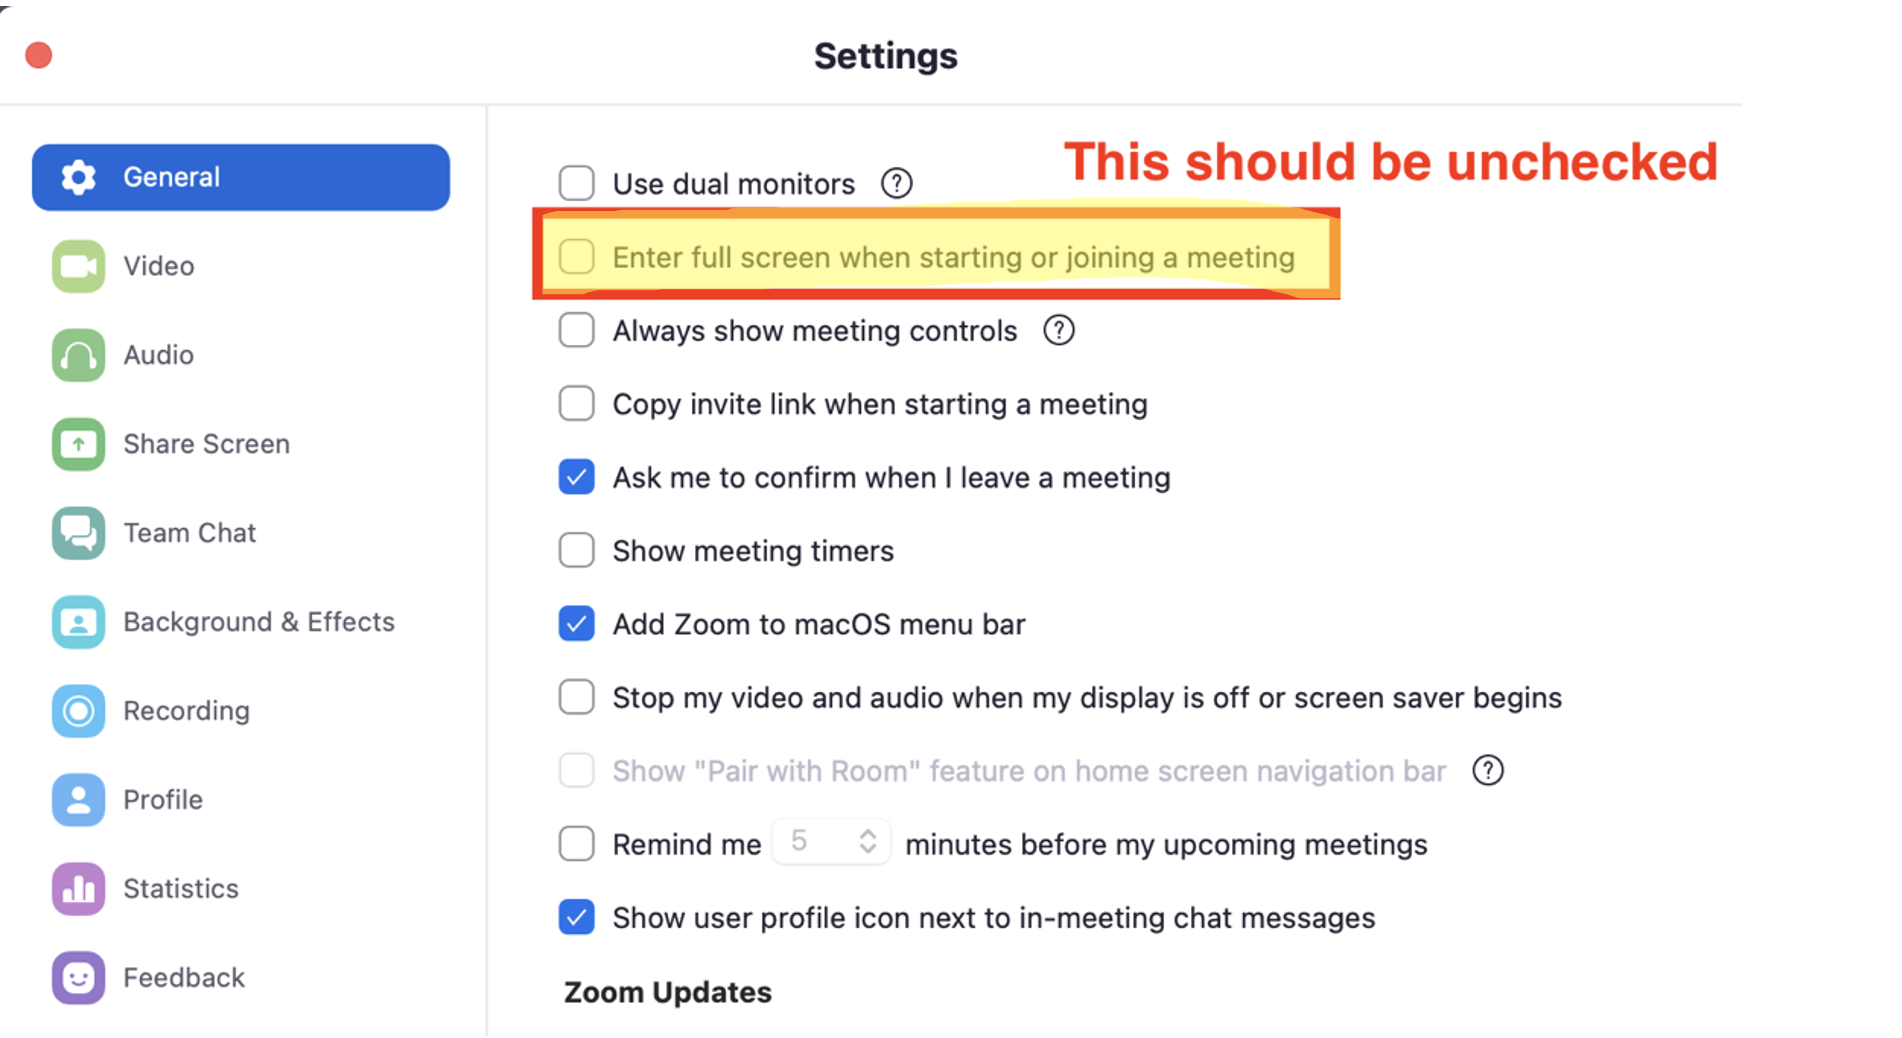
If you are using Zoom for an assessment, make sure to follow the settings below:
First:
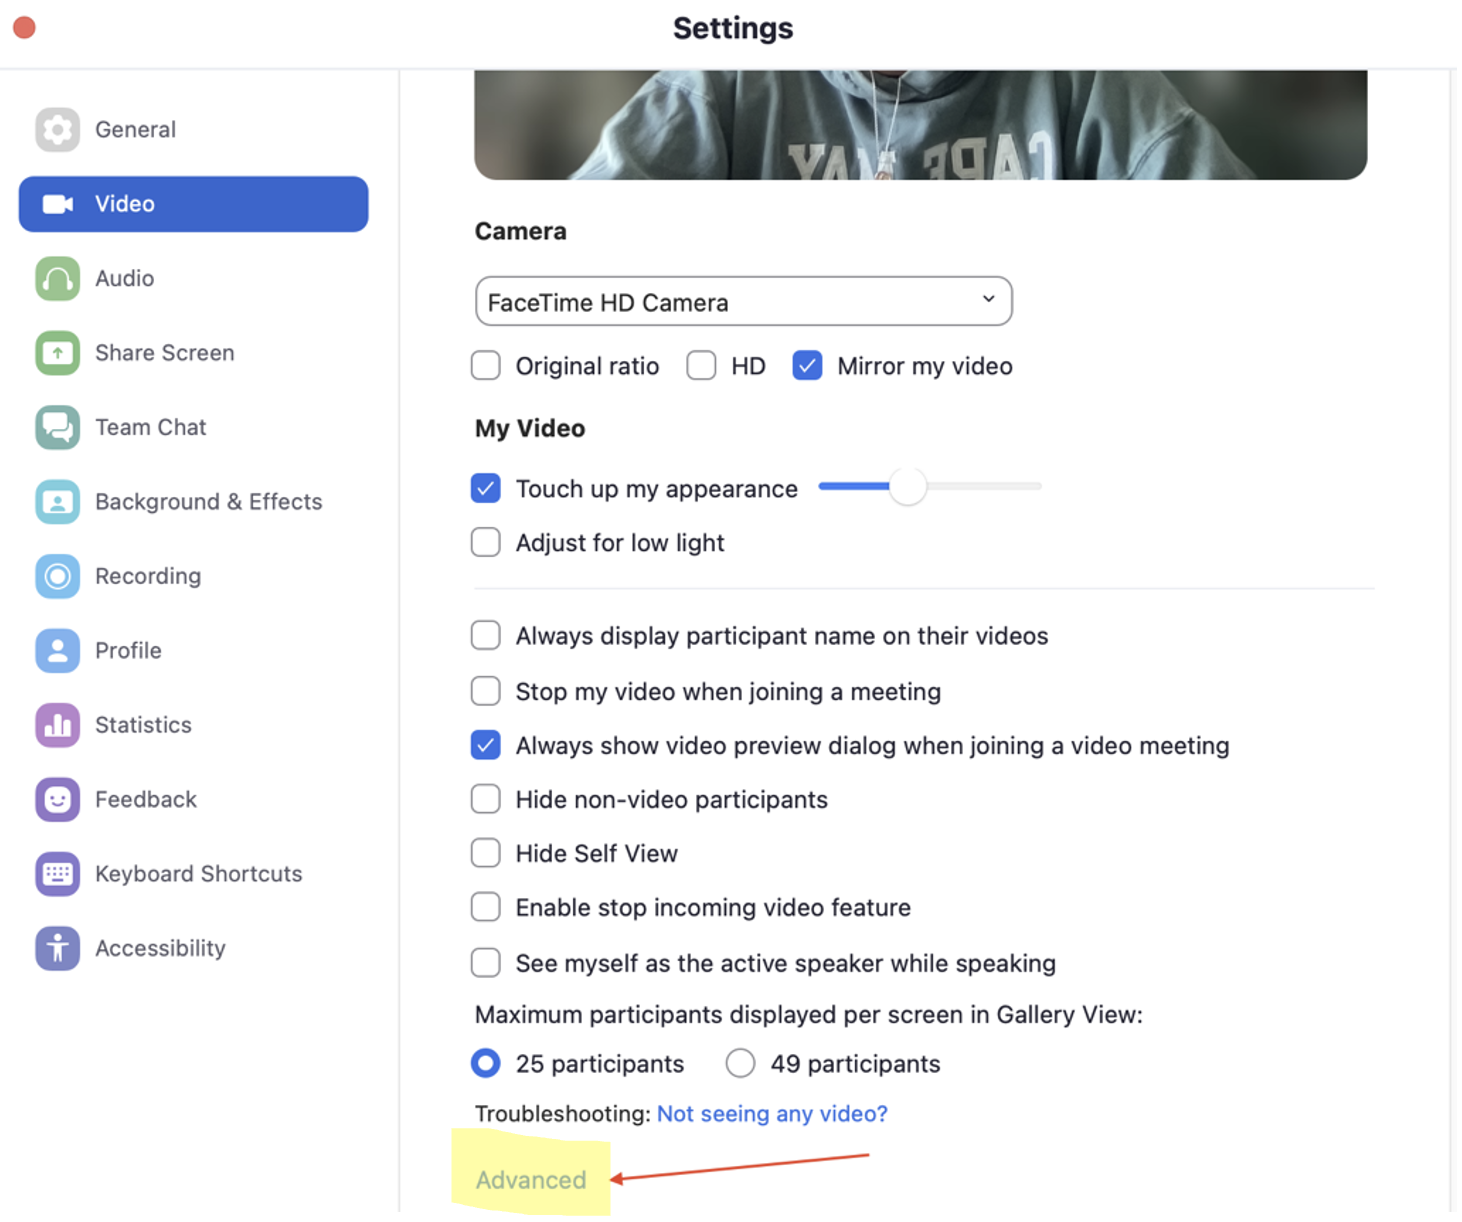
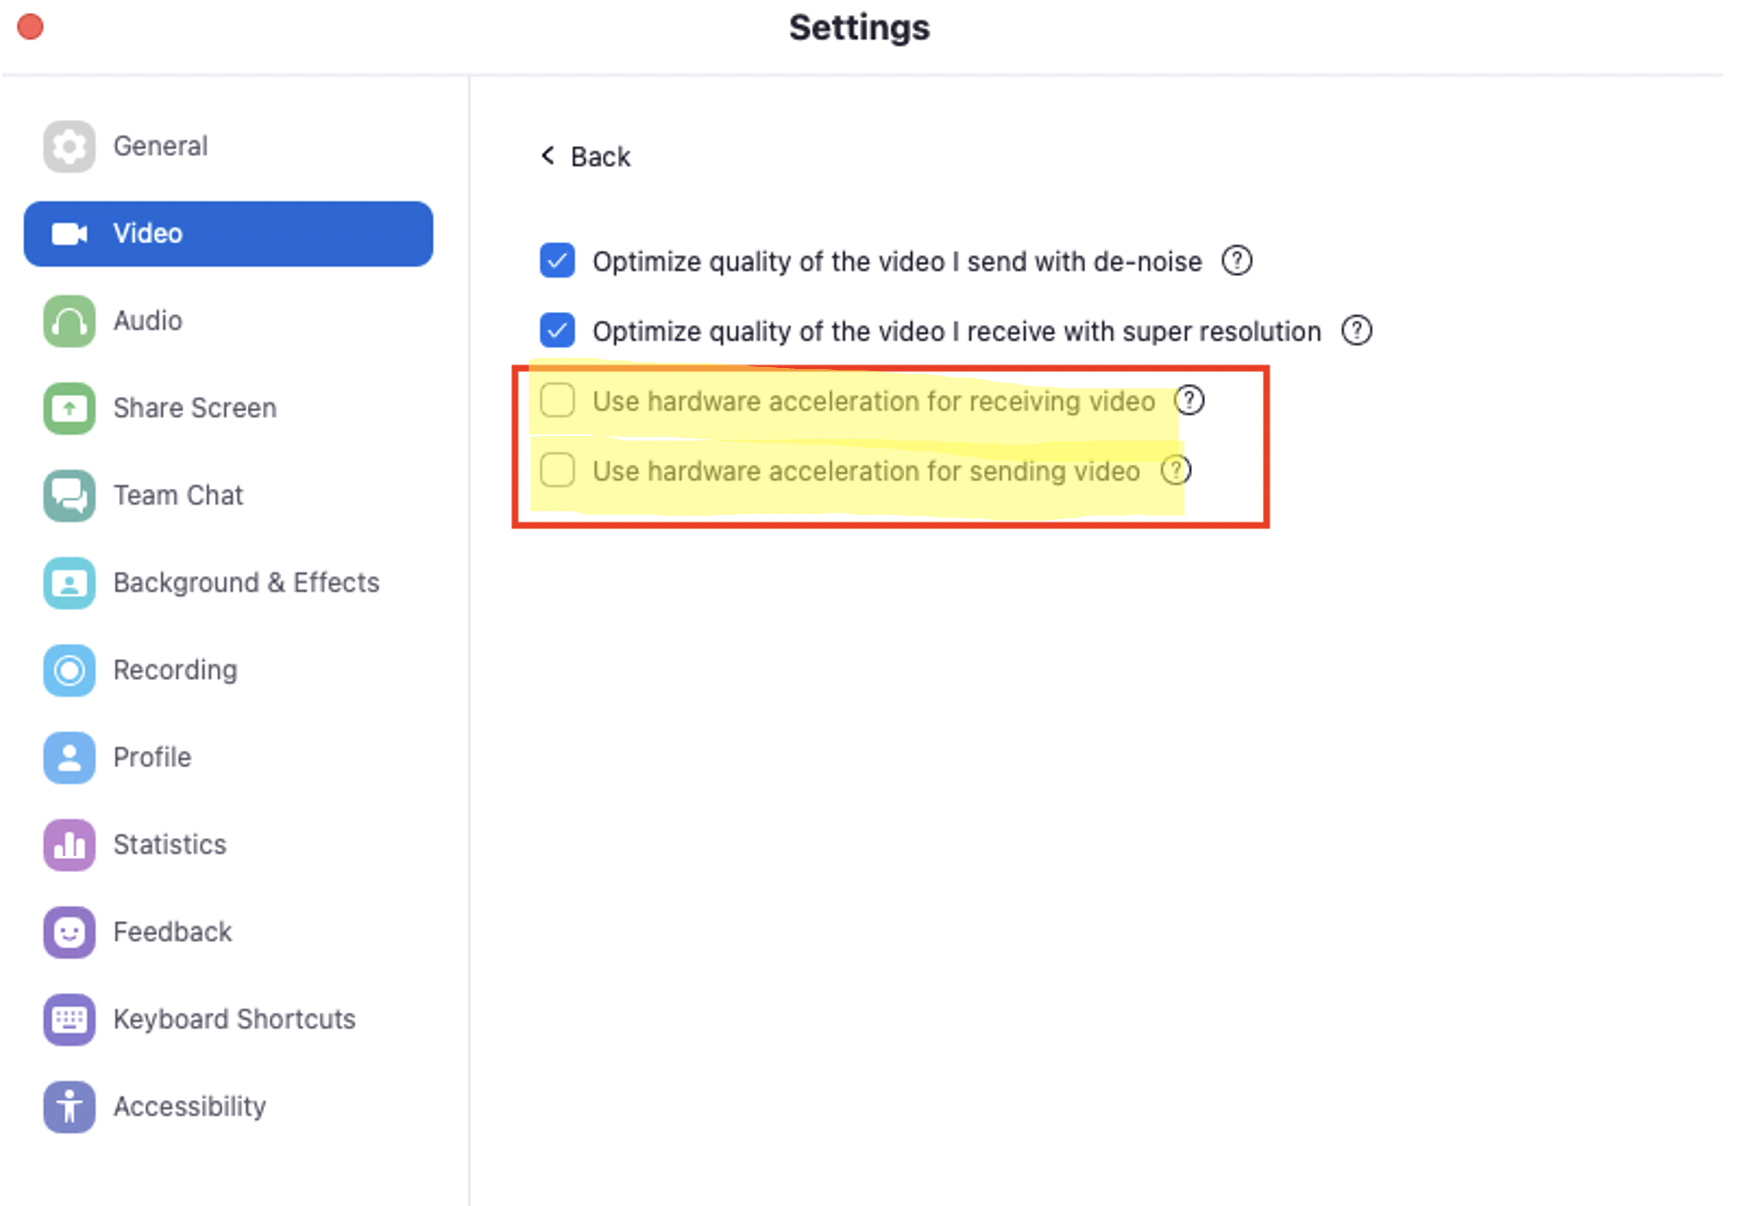
Second: Make sure the two hardware acceleration settings are unchecked. Video > Advanced.
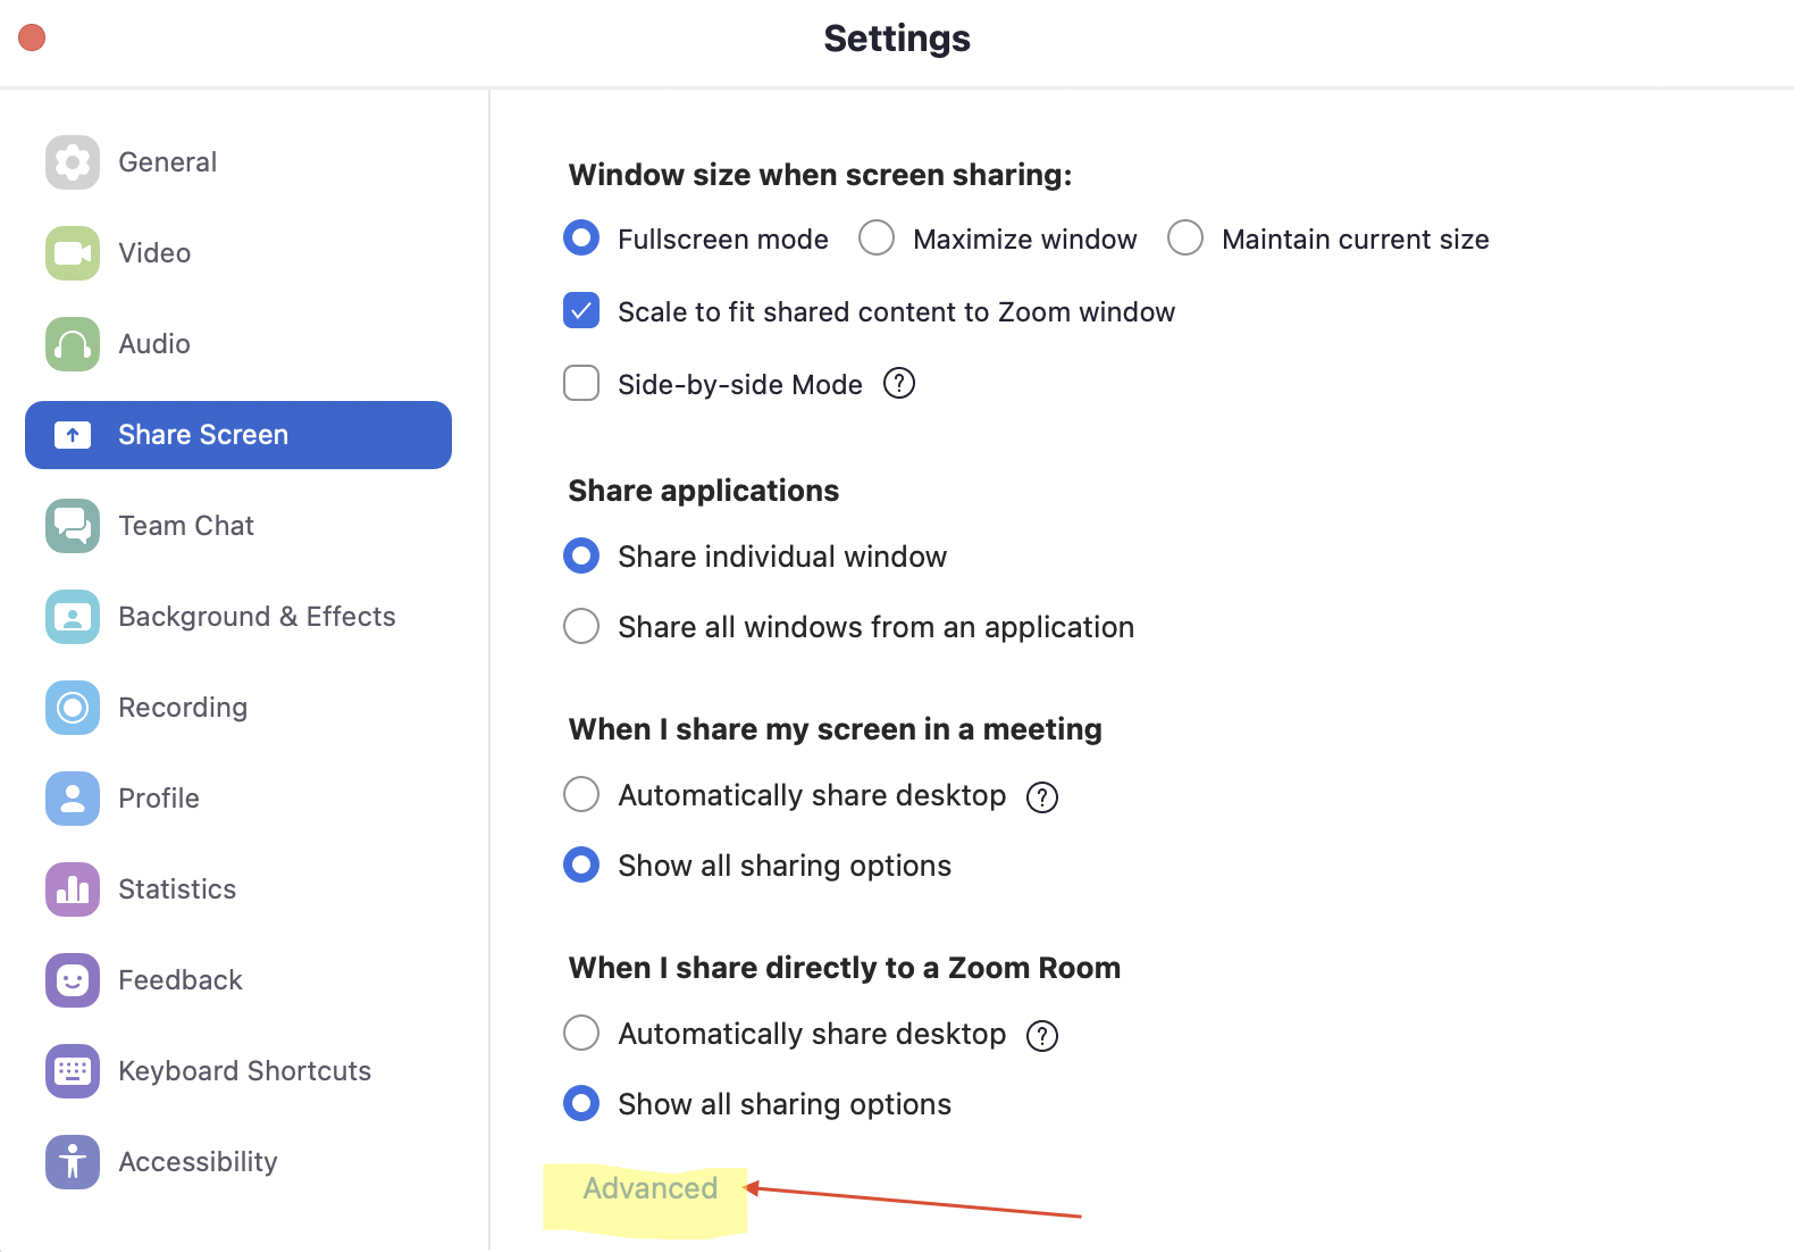
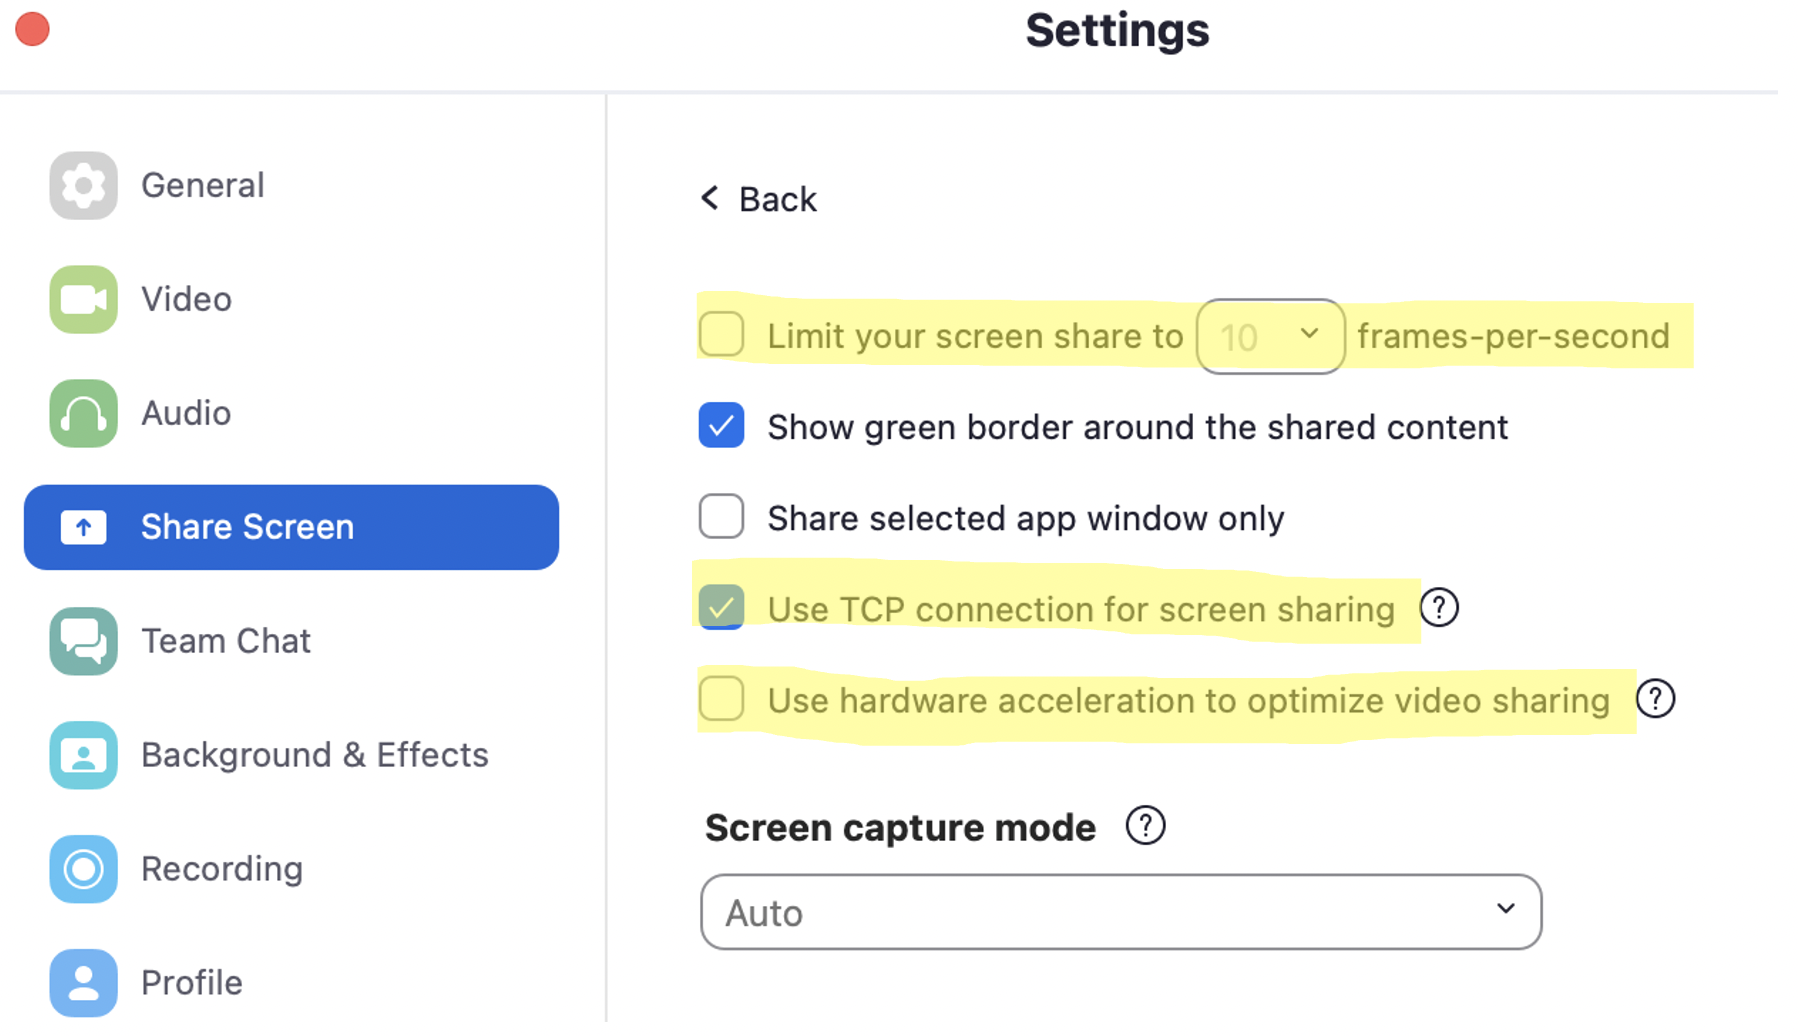
Third: Make sure the following boxes are correctly checked/unchecked. Share Screen > Advanced.
2.3 Testing Environment Setup
In-Person Assessment
The ideal testing environment will be a quiet, well-lit room that is free of visual distractions. The basic requirements for a testing room for in-person assessments include:
• 1 desk, large enough to accommodate a desktop computer with computer mouse
• 1 stationary chair for the participant
• 1 rolling/wheeled chair for the assessor
• 1 door, which can be closed to reduce noise and discourage unexpected interruptions
The desk and chairs should not block the pathway to the door. In the event of an emergency both the participant and you should be able to exit the testing space without delay.
Testing materials you will need to administer the CNB include:
• Computer (Desktop or Laptop)
• Access to ProctTrack (e.g., through iPad) OR a printout of the ProctTrack form
• Blue or Black pen if using printed ProctTrack
• Do Not Disturb Sign
Before the participant arrives, you can prepare the testing environment for the assessment by:
1. Placing the Do Not Disturb sign on the door
2. Placing the stationary chair facing the desk
3. Placing the wheeled/rolling chair to the right of the stationary chair
4. Turning on the computer and checking the mouse is plugged into the USB port correctly
5. Navigating to the WebCNP homepage
6. Logging in and clicking on the “Start Testing” button on WebCNP
7. Selecting the correct SiteID, Battery Name and entering the Family ID (FAMID), and Subject ID (SubID) as well as other applicable information, such as Visit ID, GUID in the first Demographics Information Page (see below for details on this step).
Remote Assessment
The virtual assessment can be completed by participants at a mutually agreed upon date and time (or at the participant’s leisure, pending your internal SOP) with a Desktop or Laptop computer using a corded mouse, wireless mouse, or trackpad. The assessment cannot be completed on a tablet, iPad, or smartphone at this time.
When arranging a time with the participant to provide them their personalized link, it is best to ask the participant to do their best to ensure an “ideal testing environment”, if at all possible, when completing the Virtual CNB assessment.
The ideal testing environment will be a quiet, well-lit room that is free of visual/auditory distractions.
The basic requirements for a testing room include:
1. A desk or table large enough to accommodate a desktop/laptop computer with corded mouse.
2. Secure internet connection (i.e., connected to their personal Wi-Fi and not a public connection) and access to a charger, if the computer is not already plugged in.
3. Private space with minimal distractions.
4. Ensure that the background space is appropriate and that the participant is comfortable with what will be visible to the assessor.
5. Silence notifications on the device (i.e., laptop or desktop) they will be using and any other devices in the room (e.g., phone).
In addition to the guidelines above applying to the participant, it is best if you (as the virtual assessor) adhere to the following guides when administering the CNB via survey-link:
1. Situate yourself in a private, quiet, well-lit room free of distractions.
2. Set up your computer and ensure it is plugged in.
3. Have headphones ready for the assessment to ensure good sound quality.
4. Close other programs (e.g., slack, email, Spotify) so you don’t have distracting and noisy notifications pop up while completing the assessment.
5. Log in the videoconferencing app (e.g., Zoom, BlueJeans) to start the meeting.
6. Prepare the participant’s link.
7. Open any files you need for administration (e.g., the PRA-D PDF if PRA is part of your battery) and log in ProcTrack.
2.4 Professional Appearance and Seating
For both in-person and virtual assessments, you should dress appropriately for the visit (i.e., business casual), including your lower half, if the visit is virtual.
For virtual visits, choose a clean, plain, and professional background that is non distracting (see example below). Do not use Snap or other third-party applications for virtual backgrounds. Position yourself so that your head/shoulders are in the video frame. Make sure you can see the participant clearly and that the participant has a clear view of you.

If in person, have the participant sit on the opposite side of the table (away from the door) or if seating is side by side, always sit slightly behind the participant. As an assessor, you should always sit near the door in case there is an interruption or knock or you need to step out.
Assessment Procedures
Overview
All assessment procedures can be managed through the “CNB Assessments” page. See below for an overview of the available functionalities for your assessments. More information provided in subsequent sections in the manual.

1) “New”: Register new session.
2) “History”: View past sessions.
3) ““Edit”: Edit information (e.g., subject ID, visit ID, demographics) for past sessions.
a) Only available for paid users.
4) ““ProctTrack”: Track ongoing testing session.
a) Only available for paid users.
3.1 Participant Arrival and CNB Introduction
For both in-person and remote assessments, once the participant arrives, you should:
1. Introduce yourself to the participant by name.
2. Thank them for taking the time to participate.
a. For virtual visits, ask the participant to close other programs (e.g., emails, Spotify, Slack) to avoid distractions and notifications during the assessment.
4. Ask if they would like to use the restroom or have a drink of water before beginning.
5. If the assessment is virtual/remote, confirm that they are in a private space with minimal interruptions and that they have a computer charger readily available.
6. Ask if they have any questions before they begin the CNB assessment.
For remote assessments:
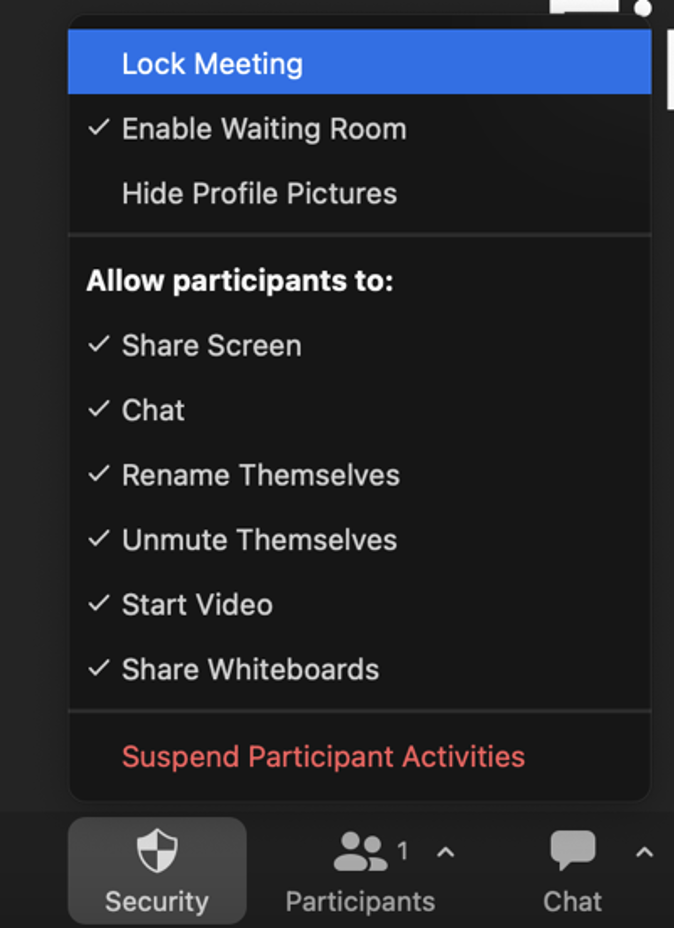
1) When the participant enters the virtual meeting room, make sure to “lock” the meeting to prevent confidentiality breaches. This setting can be enabled via the privacy settings. See below for Zoom example.
3.2 How to Initiate a CNB Battery
Register a Session and Start a Battery
Using the Mozilla Firefox, Google Chrome, Safari or Microsoft Edge web-browser, go to: https://webcnp.med.upenn.edu. Bookmark this page on your web-browser. This will save you time and prevent you from typing the WebCNB Main Menu web-address every time you administer a CNB Battery.
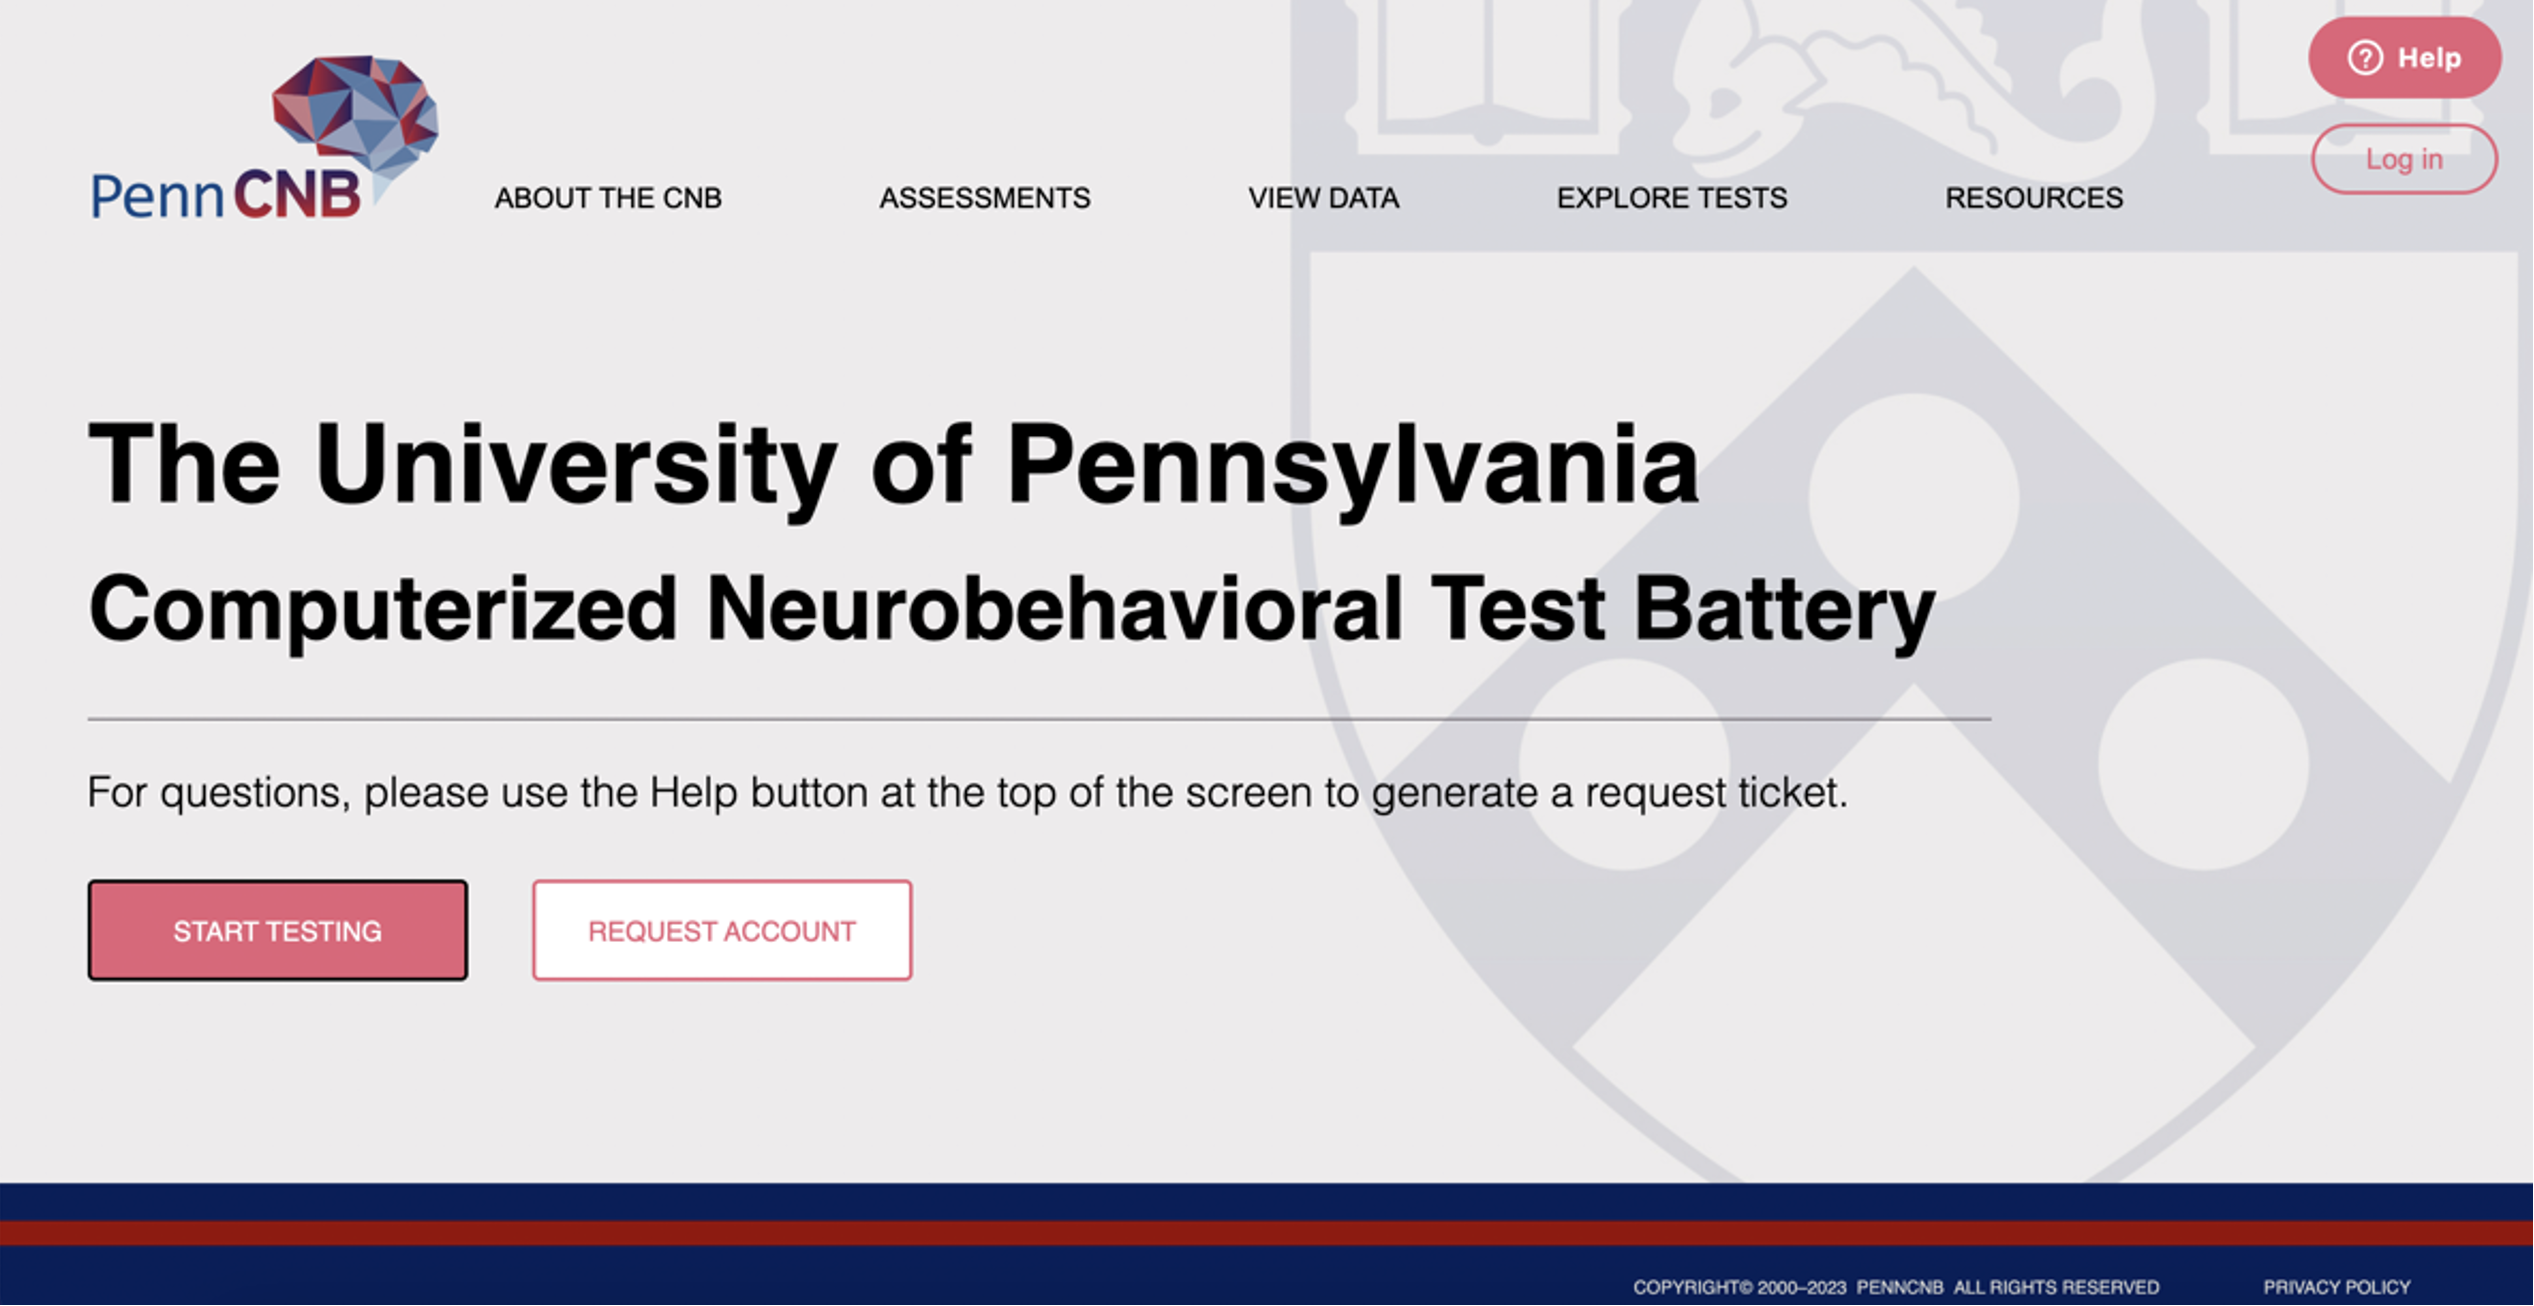
1) In the home page, click on the “Start Testing” button. This link will take you to the login page.
a) You can also select “New Assessment” under the “Assessments” menu in the navigation bar at the top of the page.
2) Enter your unique administrator ID assigned by the CNB team and your password to navigate to the next page.
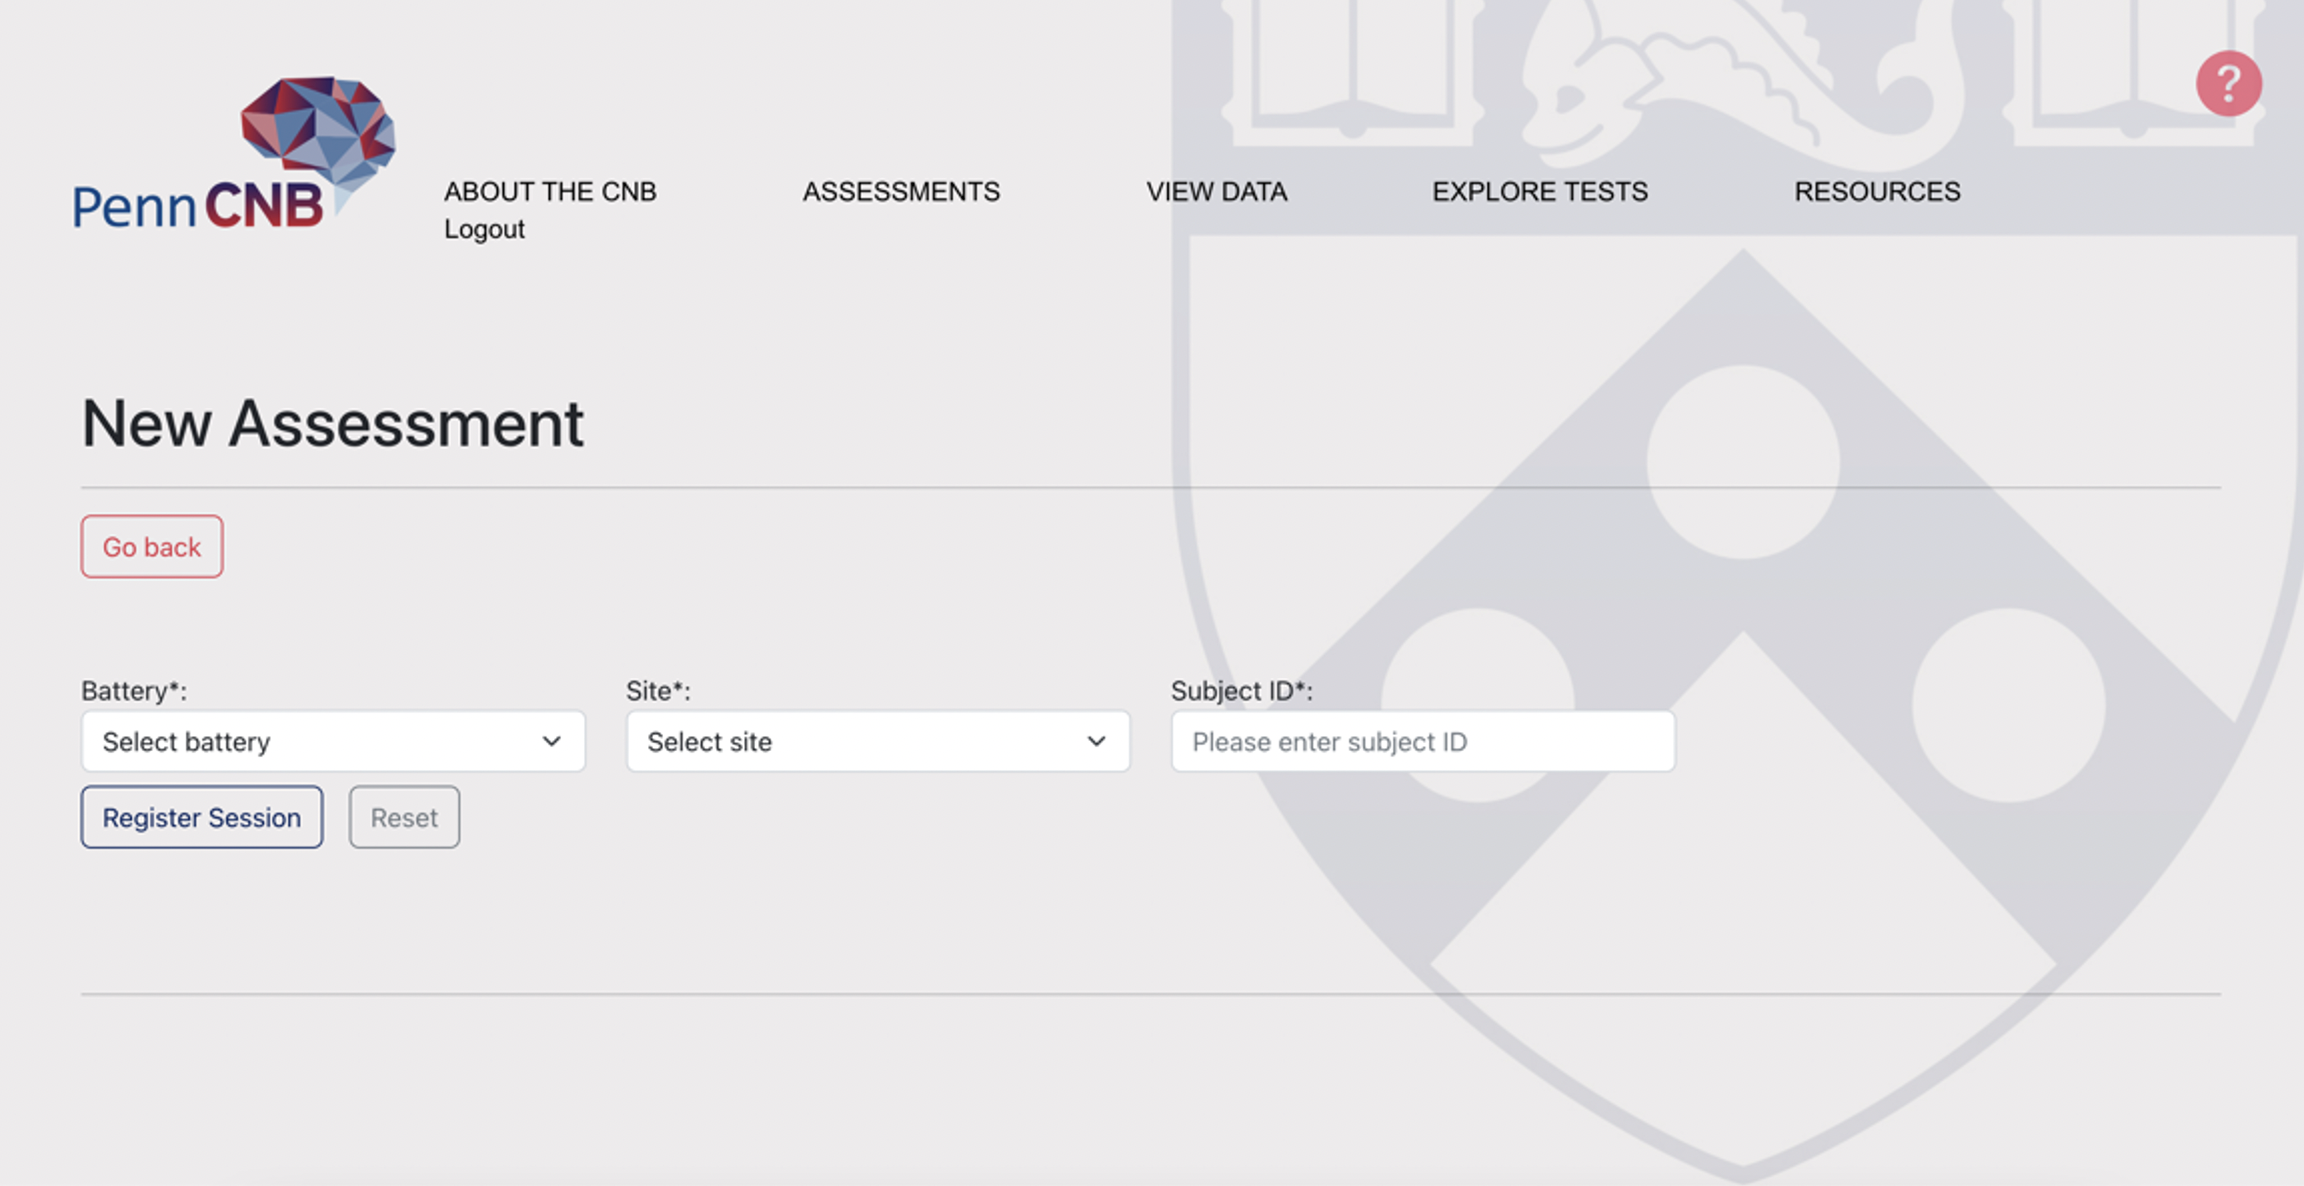
3) Enter the session information.
a) Battery: select the battery you want to administer
b) Site: select your site
c) Subject ID: enter your subject’s ID
i) If there is ever a need for a repeat visit (for example, if participant feels sick and only completes half a battery during a visit and needs to repeat the battery) please add an underscore with the repeat number after the subject ID. For example, if subject 999 needs to repeat a visit once, their subject ID would be “999_1”.
ii) Note: See below if your study is longitudinal.
d) “Reset”: click here to reset the fields above if you want to enter new information. This button will not delete the previous session, provided it had been registered.
4) Click “Register Session”.
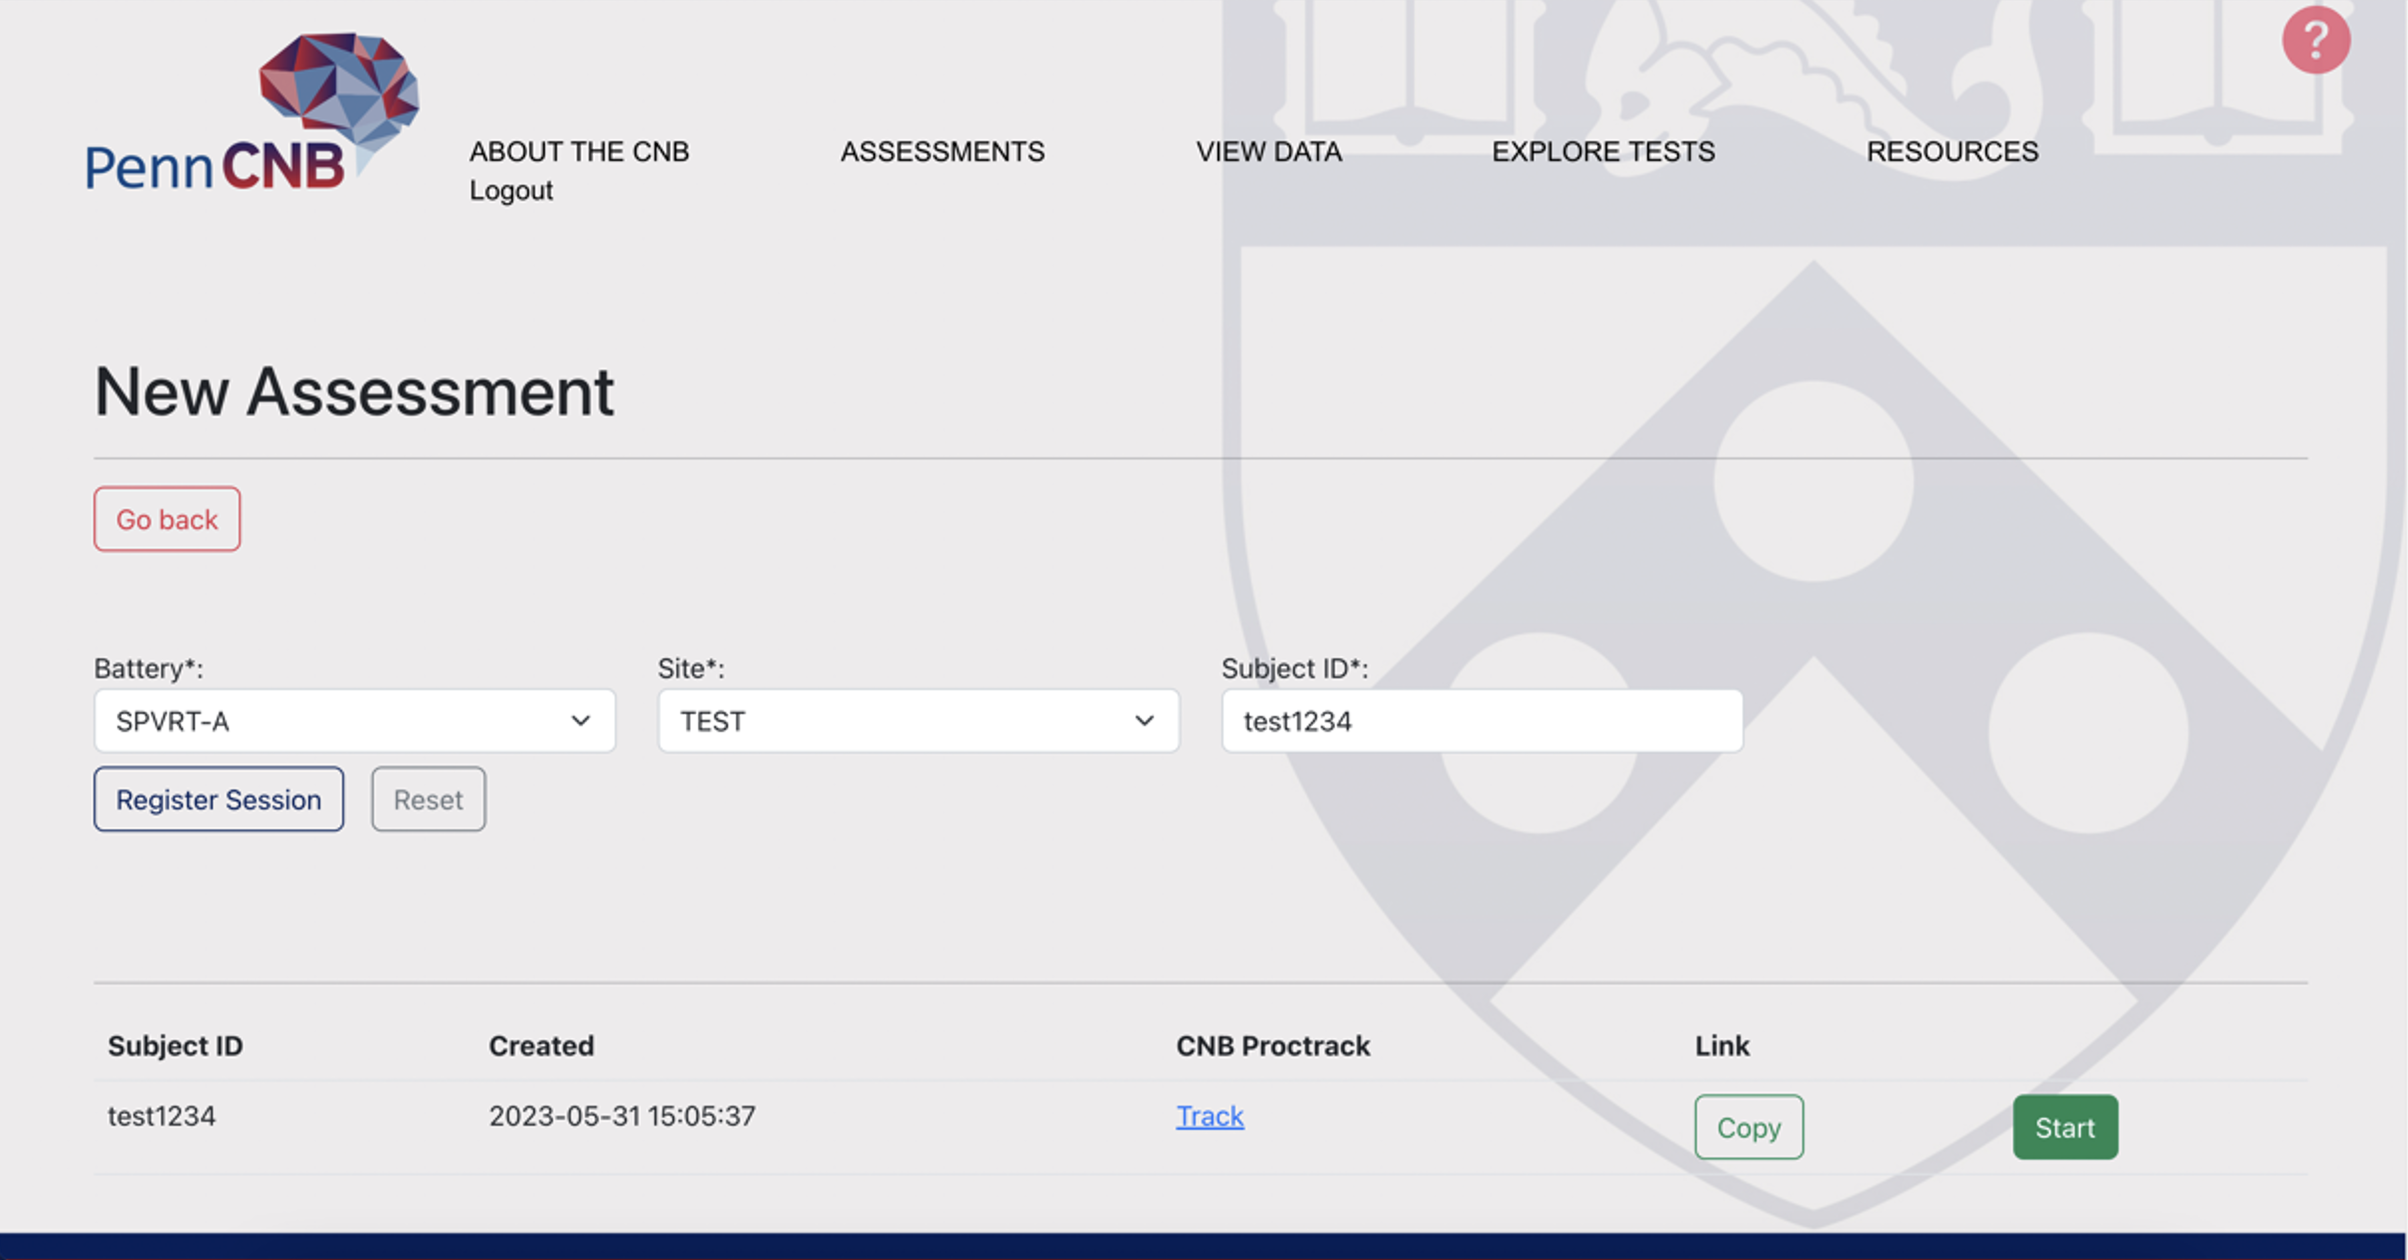
a) To launch the assessment immediately, click “Start” and complete the demographics page (click here for instructions). This page will open in a new tab, so you will still have access to the page above!
b) If you are preparing for an upcoming assessment, you can use the “Copy” button to copy the link to have it readily accessible at the time of the assessment.
i) i) Important! The link expires after 24 hours!!! If your assessment is planned to start/end in more than 24 hours after you have registered a session, you CANNOT use the same link. You will have to register a new one.
ii) If you inadvertently exit a session (e.g., the participant accidentally exits the browser or there is a technical issue), you can use this same link – as long as 24 hours have not passed – to resume the session. If you didn’t save the link, you can also find it in the Assessment History menu. Using those links will reload the introductory reminders (e.g., breaks) and it will then direct to the task where you left off – it will NOT restart. Alternatively, you can use the link generated after the demographics page (see #6 below) to resume a session.
c) If your protocol involves unproctored CNB administrations, copy the link to send it to the participant to complete the tests in their own time.
d) *Note: each time you click “Register Session”, the system generates a new session, even if the session information (i.e., battery, site, subject ID) remain unchanged. This means that, if you are copying a link, the link also changes. Additionally, when you view assessment history (see below), these will appear as separate sessions. Thus, you should exercise caution when registering sessions to avoid creating unnecessary extra sessions that could cause confusion.
e) *Note: each session can be completed only once. This means that once you have clicked “Start” (or copied, pasted, and opened the link) and submitted the demographic information, you cannot use the same link again for another testing session. You will have to register a new one.
5) After submitting the demographic information, you can access the ProctTrack page (only applies to paid users!) to track the assessment in two ways:
a) From the “New Assessment” page (tab already open!), click “Track” and you will be directed to your participant’s session tracking page.
b) Go directly to the ProctTrack page and enter the session information.
c) Note: for in-person proctored sessions, you should print this page in advance, before the participant’s arrival. Print button is available on the page (see below).
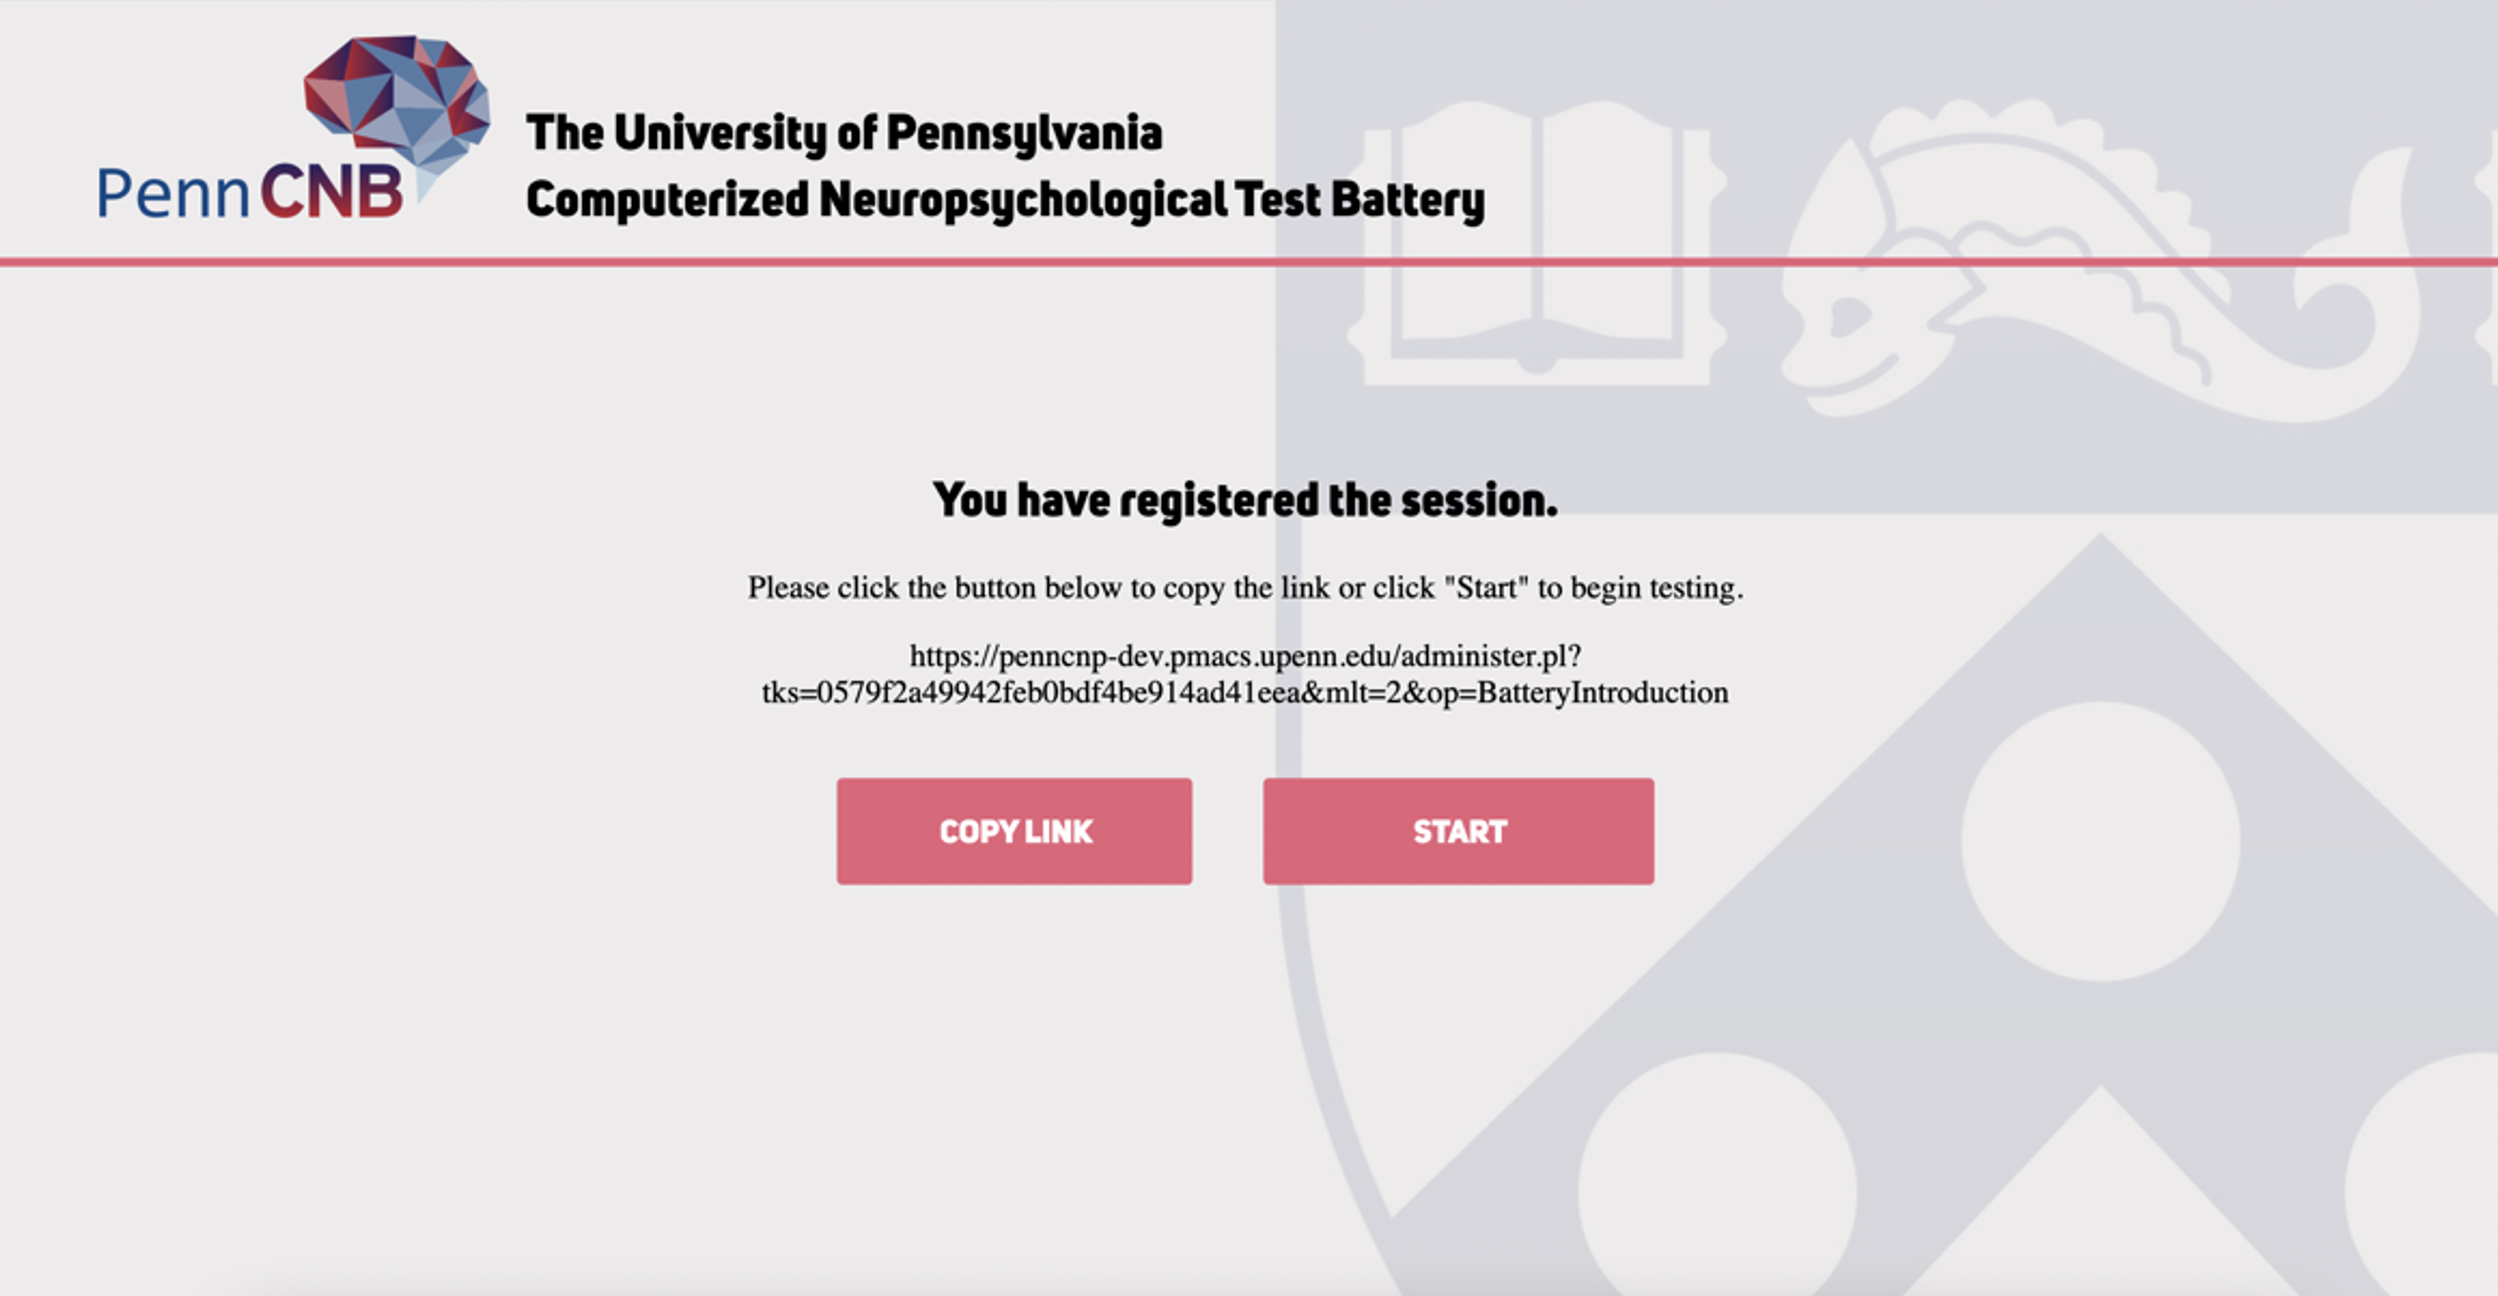
6) Once you submit the demographic information, the next page below will display a link, which you can share with the participant, depending on your assessment type (see here).
a) In-Person Proctored: since you are present with the participant in the same room, you can click “Start” to begin testing.
b) Remote Proctored: since you will be in a videoconference call with the participant, you can copy the link – either via the “Copy Link” button or directly from the screen – and send it according to your internal procedures (via email, via chat feature during video meeting, or via a database).
i) Say, “Ok, I’m going to send you the link for your CNB battery in the chat feature of the meeting application. Can you please open the link and share your screen?”
c) Self-Administered Monitored.
d) Unproctored: N/A. The participant will be completing the assessment in their own time and you will have already sent them the very first link, after registering the session, so they can complete the demographics page on their own too.
i) *See step 5b above.
7) Once you click “Start” OR once the participant has opened the link in their browser, you will see the page below.
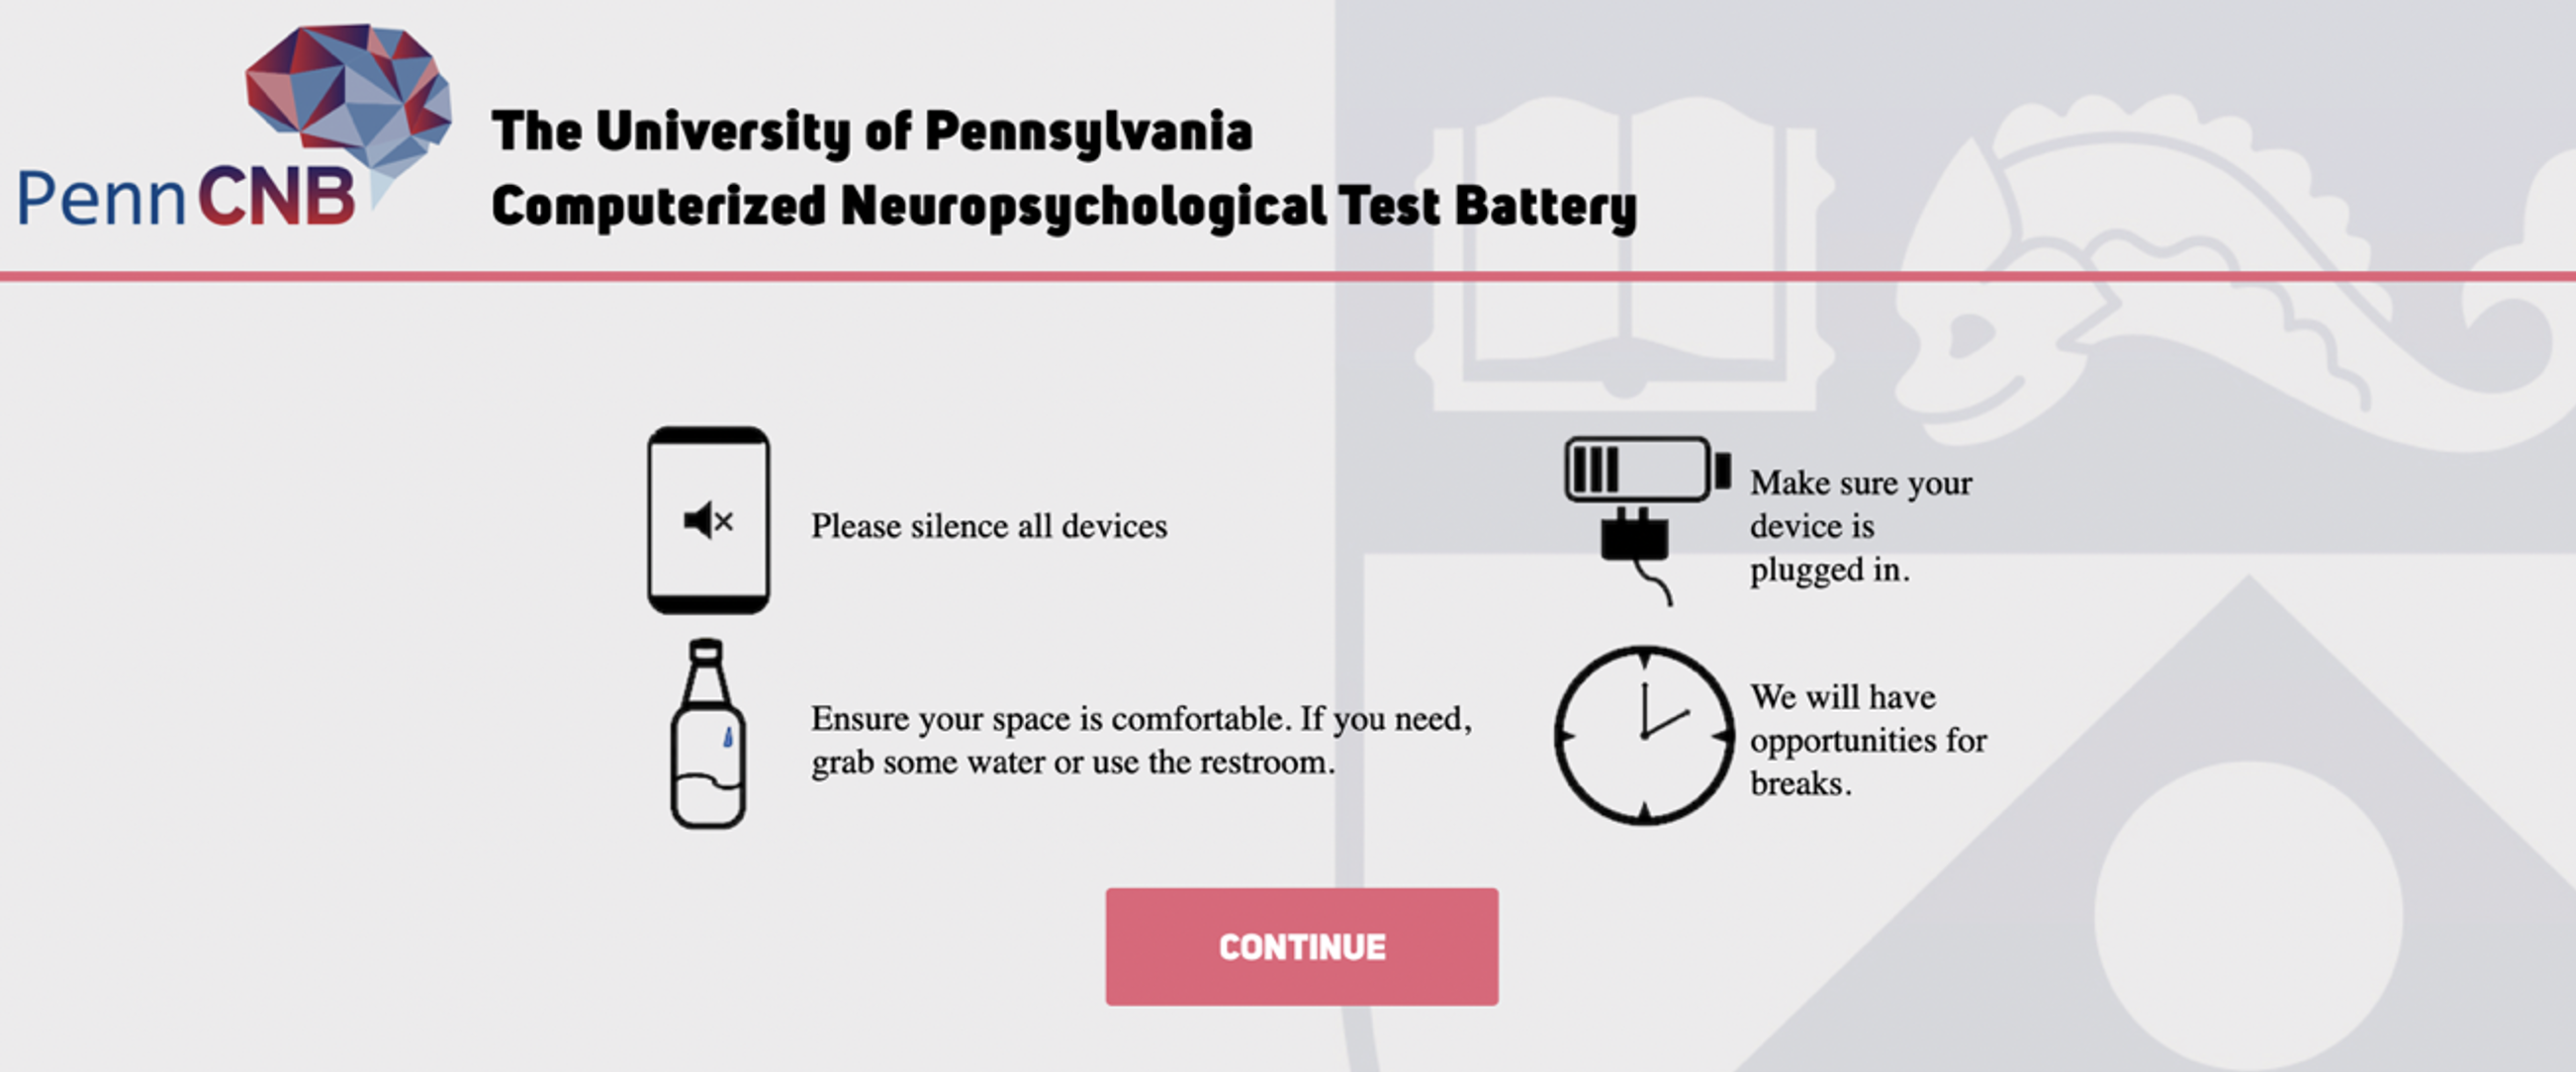
8) Read all four prompts to the participant and give them time to make adjustments, if needed (e.g., silence phone, plug computer, grab water, etc.).
9) Click “Continue” to move to the next page and read the blurb below to the participant.

“We will now do some memory and puzzle-like games on the computer. Some are easy and some are more difficult. Don't worry if you make mistakes -- everyone does. Try your hardest, working accurately and quickly. Some questions may take more time than others, and that's ok; just do your best on each one.
Please wait for me to ask to press the “CLICK HERE TO CONTINUE” button before proceeding during the tests. Do you have any questions?
Let's begin.”
10) You or the participant can click the “Start” button to begin the first CNB task.
If you are unsure how to register a session for your participants, please contact the CNB Implementation Manager for assistance. Make sure to denote the name of the study, Principal Investigator, battery name and site, so that they can assist you.
Longitudinal Studies
If your study is longitudinal, i.e., involves more than one assessment per participant, you must add the visit number on the back end after each session. See section “Edit Sessions” for more information about entering visit number post assessment.
Demographic Information
At the start of every testing session, the assessor collects demographic information for both in-person and remote assessments. For all proctored assessments, this information is always collected by the assessor on the assessor’s device, even for remote assessments. After completing the demographics page, the assessor shares the link with the participant, so that the participant can open the battery on their end and screenshare.Enter the required information for the Demographic Information Page fields as per below.
• Note: Required fields are indicated with a red asterisk (*)

“Ok, I’m going to ask you a few basic questions about yourself and then we’ll get started with the CNB.
1. “How old are you today?”
a. Enter whole years of age (do not round up)
2. “What’s your Date of Birth?”
a. Enter the year of the participant’s birthday manually, following the YYYY format (e.g. 1976).
3. “What sex were you assigned at birth?”
a. Select either “Male”, “Female”, “Intersex”, or “Prefer not to say”
4. “How would you describe your gender?”
a. If the participant doesn’t understand the question, list the dropdown menu options.
b. This question is not required.
5. “Which hand do you write with, left, right, or both?”
a. If participant says they are Left Handed, ask which hand they want to use the mouse. If they are Left Hand dominant, but want to use the mouse with their right hand, select “BOTH” and make a note of this in the note sheet.
6. “Where are you taking the test?”
a. If the participant is on-site, just click “Lab”.
7. For all the education questions, you only have to answer one of two per individual. E.g., either mother’s education in number of years completed or mother’s highest level achieved would suffice. You still have to have at least one of the two questions answered for the participant’s, the mother’s, and the father’s education. Please make every effort to respond to both questions even though one is required.
a. “What is the highest level of education you have completed?”
i. Select the number of years completed in school by the participant (also known as their highest education level) and the highest level/degree achieved (e.g., Bachelor’s).
ii. If the participant does not completely understand or seems confused, provide examples, e.g., high school, Bachelor’s, Associate’s.
iii. If the participant is unsure about either of the questions, it is okay to leave one blank.
b. “To the best of your knowledge, what is the highest level of education that your mother has completed?”
i. Follow the principles outlined above for the participant’s education to complete the mother’s education.
c. “To the best of your knowledge, what is the highest level of education that your father has completed?”
i. Follow the principles outlined above for the participant’s education to complete the mother’s education.
Education table
| Years of Education | Value | Notes |
|---|---|---|
| 0 | No formal education | |
| 1 | Completed 1st Grade | |
| 2 | Completed 2nd Grade | |
| 3 | Completed 3rd Grade | |
| 4 | Completed 4th Grade | |
| 5 | Completed 5th Grade | |
| 6 | Completed 6th Grade | |
| 7 | Completed 7th Grade | |
| 8 | Completed 8th Grade | |
| 9 | Completed 9th Grade | Freshman in High School |
| 10 | Completed 10th Grade | Sophomore in High School |
| 11 | Completed 11th Grade | Junior in High School |
| 12 | Completed 12th Grade | Senior in High School |
| 13 | Completed 1 year of college | Freshman in College at 4-year program |
| 14 | Completed 2 years of college / Associate's Degree | Sophomore in College at 4-year program |
| 15 | Completed 3 years of college | Junior in College at 4 year> |
| 16 | Completed 4 years of college / Bachelor's Degree | Senior in College at 4-year program |
| 17 | Completed 1 year of Graduate school | Master's as part of a 5-year program |
| 18 | Completed 2 years of Graduate school | Master's Degree |
| 19 | Completed 3 years of Graduate school / JD degree (law) | |
| 20 | Completed PhD, M.D. or D.O. degree |
Note: The maximum Education Level for any person is 20, even if they have a PhD and/or MD degree as well as post-doctoral fellowships.
Note: If the participant is a sophomore in college at the moment, then their education is equal to 13 years, not 14, because they have not yet completed sophomore year.
| Levels of Education |
|---|
| No schooling completed |
| Nursery School |
| Primary Education (completed primary program. Typically 6 years duration) |
| Lower Secondary Education (completed middle school, or junior high school. Typically a total of 9 years of education) |
| Upper Secondary Education (completed senior secondary school, or high school. Typically 12 years total of education) |
| GED or alternative credential |
| Some college credit, but less than 1 year of college |
| 1 or more years of college credit, no degree |
| Associates degree (for example, AA, AS) |
| Bachelor’s degree (for example BA, BS) |
| Master’s degree (for example: MA, MS, Meng, Med, MSW, MBA) |
| Professional degree beyond bachelor’s degree (for example, MD, DDS, DVM, LLB, JD) |
8. “Do you speak English as a primary language?”
a. If the participant answers “No”, then ask “How well do you speak/read English?”
i. From the dropdown menu, select “Fluent”, “Conversational”, “Basic”, “Not at all”
9. Say to the participant: “I will let you know when you can take a break, if you want one. Do you have any questions?”
a. Answer any questions, otherwise say “Let's begin.”
10. Click the “Register Session” button to move to the next page.
3.3 ProctTrack
*This feature is only available to paid users.
It is important to track proctored assessments throughout testing. That includes entering task/session status, comments, documenting issues, questions, and breaks. You can access ProctTrack from your computer or tablet. If administering in-person and don’t have access to a tablet, you can print the form through ProctTrack in advance and enter the information online after the session (see instructions below).
1. After you complete the demographic information page and get to the title page of the first task, you should be able to find your session on ProctTrack. You can access ProctTrack through the Assessments page.
a. *Note: you can also access ProctTrack through the “New Assessment” page as per step #5 above.
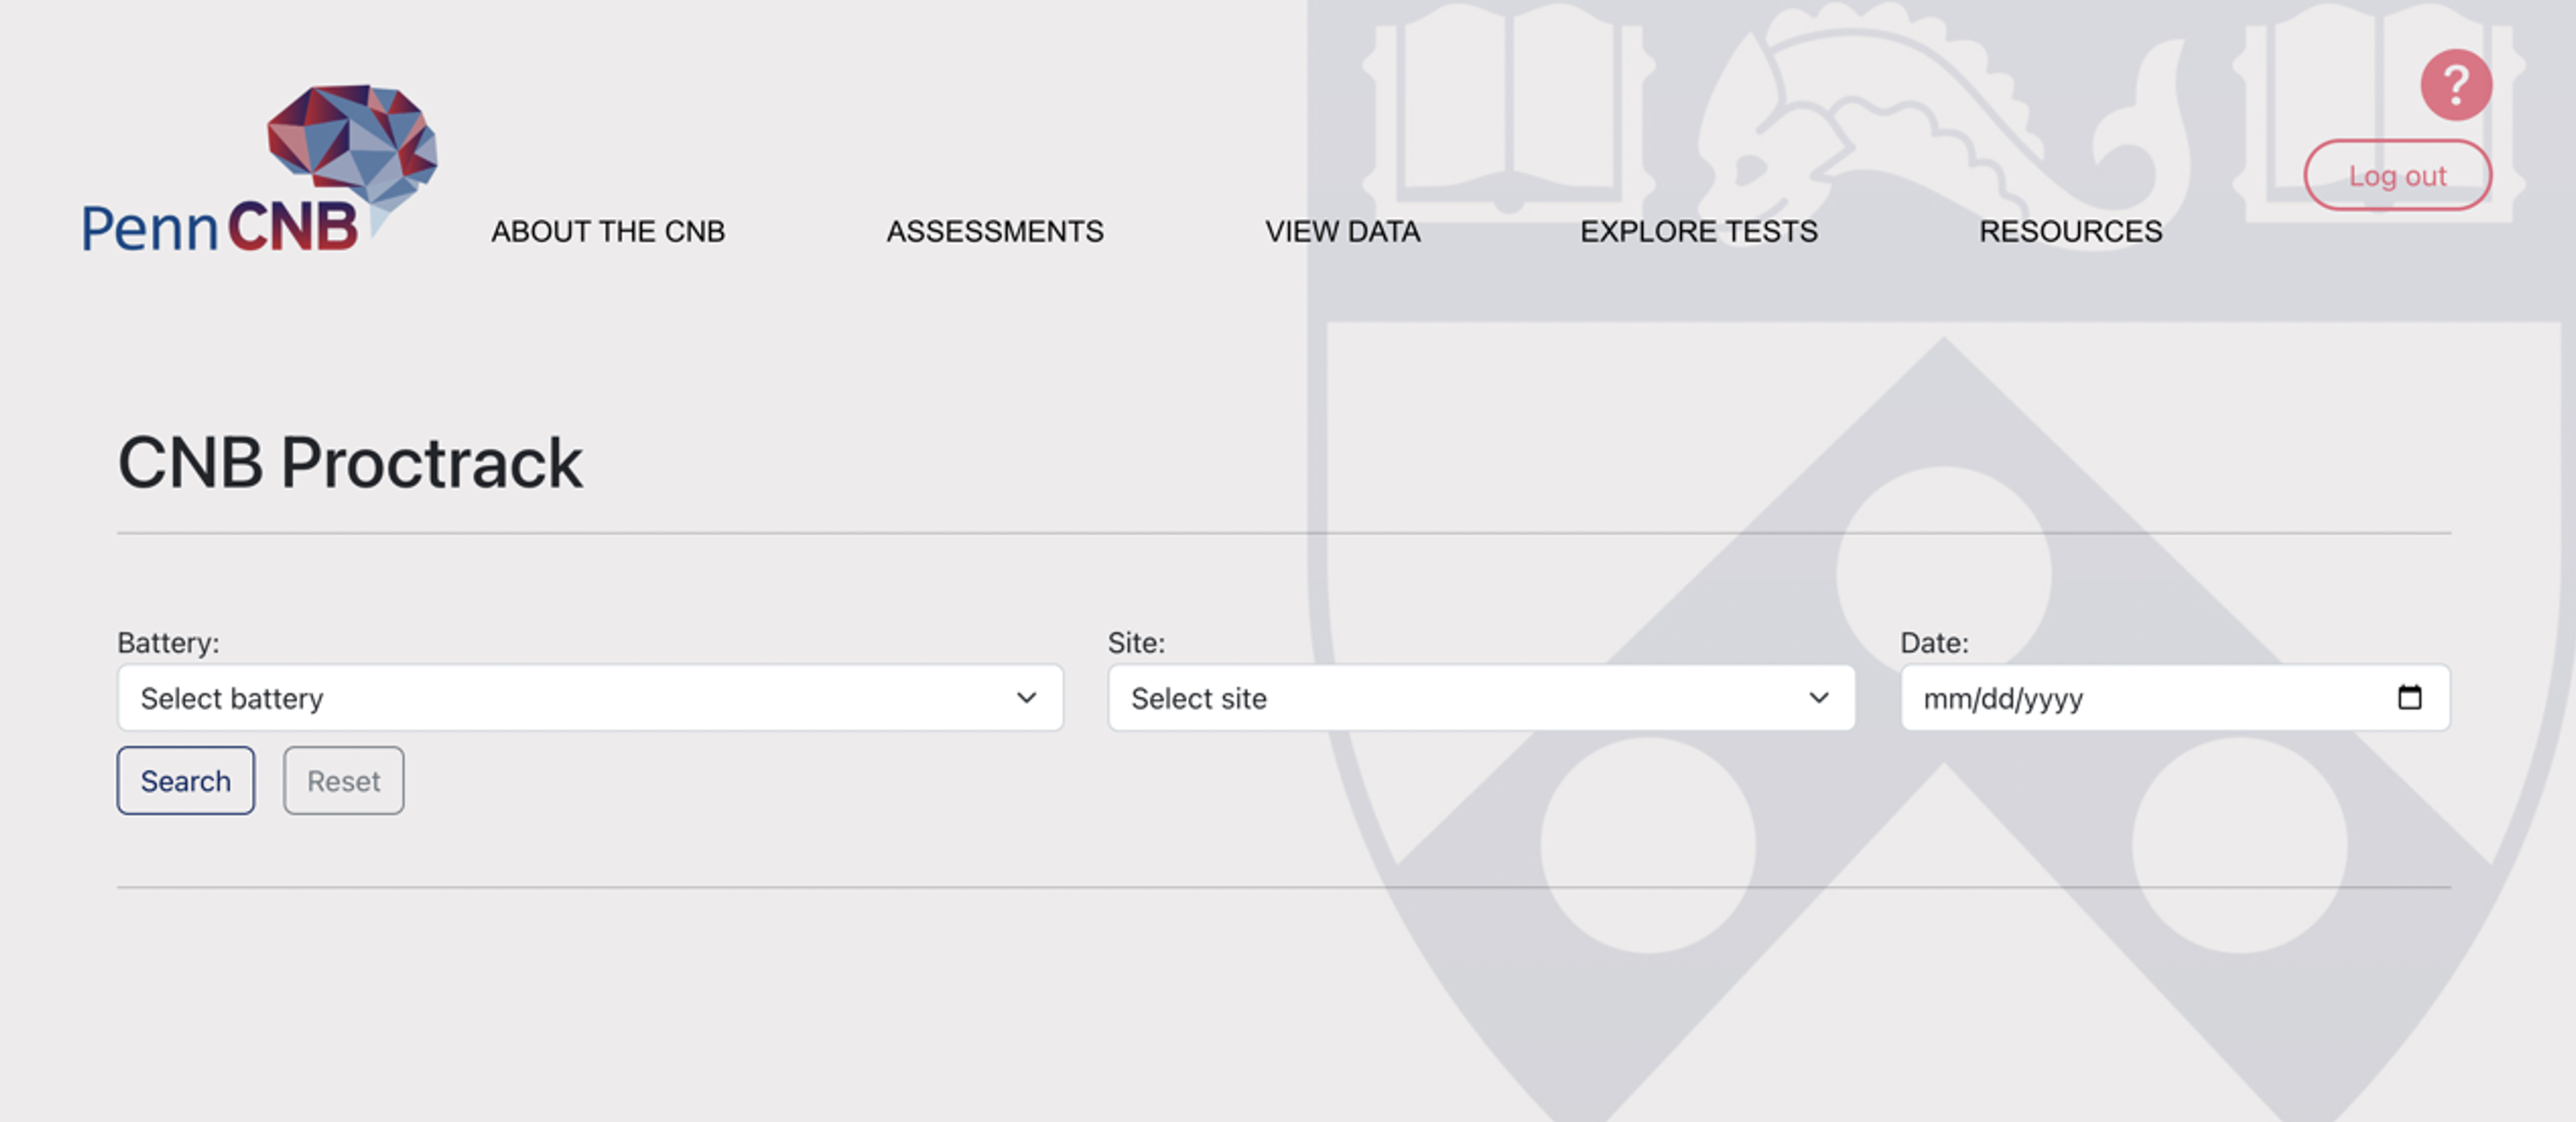
2. Select your battery, Site ID, and date of assessment and click “Search”.
3. All sessions administered using this battery and Site ID on the selected date will appear. Make sure to double check subject ID to select your own session. Session status will appear “In Session” and highlighted in red for “live” assessments, i.e., your session.4. Click on the “Datasetid” hyperlink to track your session.
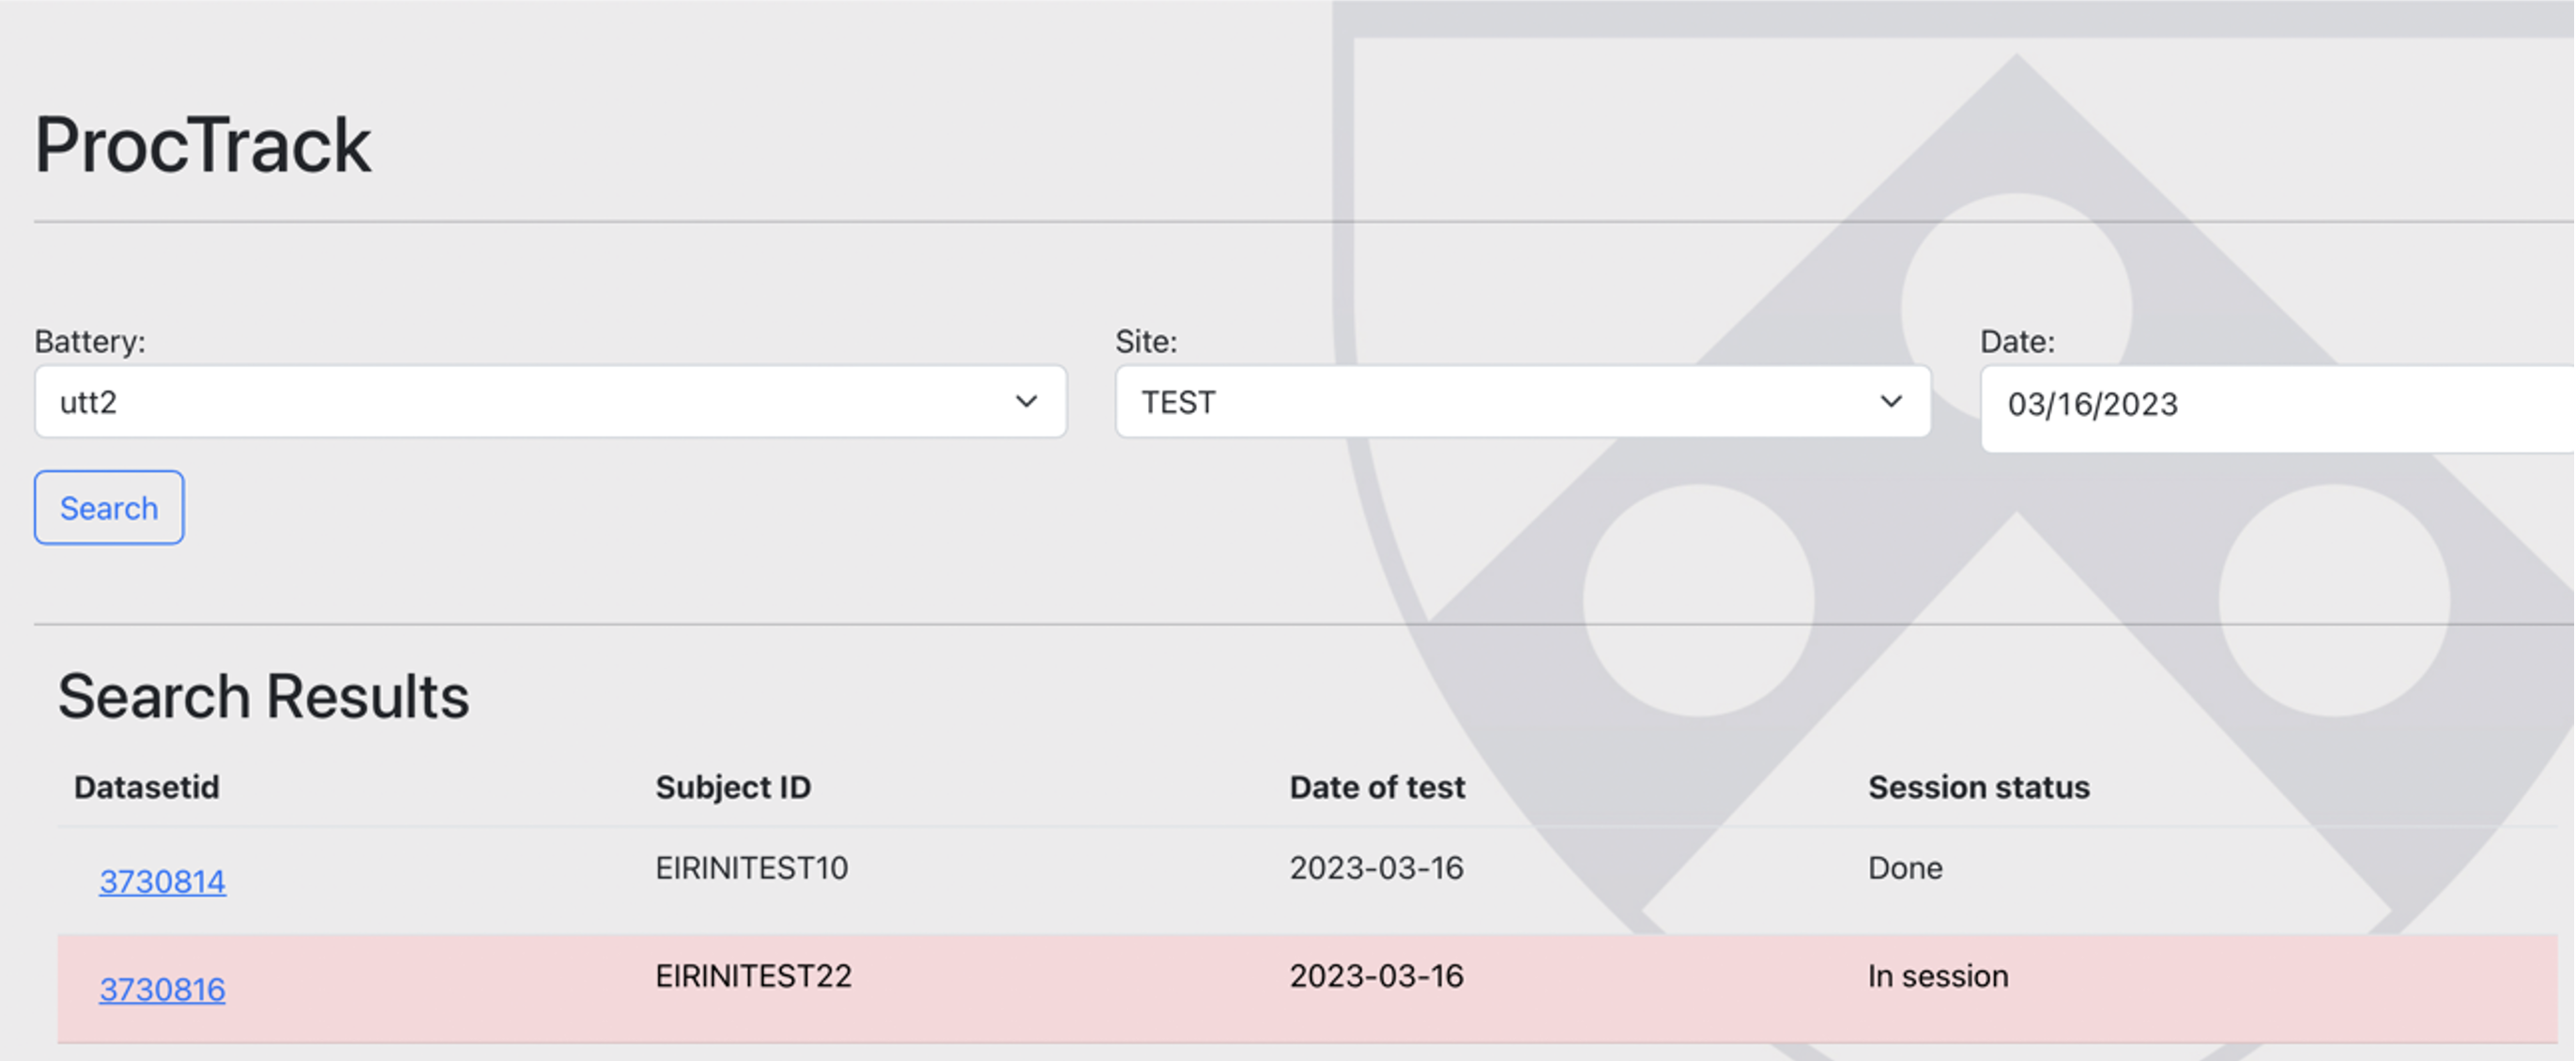
5. Non-edited tests will appear highlighted in red. You will be able to view all tests in your battery, in the order of administration. For each task, you will see:
a. Task name
b. Task status: shows whether the task is in progress, coming up next (“queued”), completed, or skipped. This is automatically assigned and is refreshed every few seconds.
c. Status code: manually assigned by the assessor after a task has been completed. Different status codes are:
i. Good Data:
1. Assigned when at least 90% of the data are complete and participant appeared to try their best throughout the task.
2. When selected, this status should not be accompanied by a comment.
ii. Questionable Data
1. More than 10% of the trials were compromised.
iii. Skipped
1. Task was skipped either before or during trials.
iv. Incomplete
v. Training data
1. Test was ran for training purposes, not a real participant.
d. Comments: assessor must select a comment if status code is not “Good Data”. See below for options.

| Comments |
|---|
| Participant had trouble understanding instructions. |
| Participant multitasking (e.g., texting, frequently looking away from computer). |
| Participant was inattentive and/or distracted. |
| Participant had issues with language fluency. |
| Participant seemed tired/under the weather (e.g., was yawning, sneezing/bad allergies). |
| Participant had substantial physical limitations. |
| Participant had interfering mental health symptoms (e.g., manic, disengaged). |
| Participant had technical issues (e.g., device/laptop related, platform related, network related). |
| Participant did not want to continue. |
| Distracting environment (e.g., noise, pet). |
| Lack of privacy (e.g., kid, sibling, partner, parent). |
| Assessor had technical issues (e.g., device/laptop related, platform related, network related). |
| Assessor conducted a non-standard assessment (e.g., responded on behalf of participant). |
| Assessment ended by administrator. |
| Participant quit assessment. |
6. Once a task is completed, click “Edit” to add a Status Code and a Comment. Then “Save”.
7. Once the assessment is completed, assign a status and comment to the overall session and click “Save”.
For a comprehensive training on using ProctTrack and rating data quality, see this video: https://upenn.box.com/s/m0exizvxcaii00987dp0u3s29n61h34z..
3.4 Assessment History
1) To view a history of your assessments click on “Assessments” in the navigation bar and select the “History” icon in the page below.

2) This page allows you to see your previously registered sessions.
a) Battery: select the battery you want to view past sessions for. This is a required field.
b) Site: select the site you want to view past sessions for. This is a required field.
c) Subject ID: enter the subject ID of the participant whose sessions you want to view. This field is optional.

3) Click “Search”.
4) Your previously registered sessions will be displayed next.
a) Subject ID: your participant’s ID.
b) Created: the date the session was registered.
c) Status: assessment status:
i) Not started: assessment has not started. This can mean that the generated session was never initiated or that the session was initiated but the demographic information was not submitted.
(1) *Note: assessments with this status disappear after 24 hours. In other words, if you have registered a new session but never started testing, the unused session will expire after 24 hours and will no longer be displayed under “History”.
ii) Started: displayed once testing has begun. An assessment is considered “started” once the demographic information has been submitted.
(1) *Note: a session that has not been completed after 24 hrs since start time will disappear from the history page.
iii) Complete: displayed once the battery has ended (i.e., completed, skipped, etc.).
d) Dataset ID: this is displayed for a given session only if it has been started.
e) CNB ProctTrack: click here to access ProctTrack. If a session has a dataset ID (i.e., has started), this link will lead you to the session-specific ProctTrack page. If a session doesn’t have a dataset ID (i.e., has not started), this link will direct you to the general ProctTrack page.
f) Link: for started sessions, you can click the “Copy” button to copy the assessment link and share it with your participant. Alternatively, you can click “Start” to begin testing on your browser.
i) *Note: both options will direct you to where the battery was left off. For example, if you had just submitted the demographic information, they would direct you to the introduction break pages, before the tests. If you had already started the CNB tasks, they would direct you where you left off in the battery, i.e., the next task to be administered.

3.5 Completing the Assessment
It is important to ensure that the CNB battery is completed correctly so the record is not marked as “incomplete” in the database. When the battery is completed, a message will be displayed on the screen that states, “You have completed the test battery. Thank you for your participation. Please close the browser to exit”. When this page is displayed, you (in-person assessment) or the participant (virtual assessment) can now safely close the browser window and the CNB assessment has been completed. The way to ensure the CNB battery for assessments are completed correctly is to check the battery completion status on ProctTrack.
3.6 Wrap-Up
“You worked really hard on those tests. I know it was long, but the data are really important for the study. We really appreciate that you did your best on each test.”
3.7 Test-Specific Notes for Virtual Assessments
For certain projects, the first test is proctored, not self-administered. This means that responses are recorded by the assessor. The following tests are proctored:
• PRA-D: Penn Reading Assessment
• WRAT4 – WRAT4 Reading Test, Blue Form
• (S)PLLT – (Short) Penn List Learning Test
To initiate a testing session that starts with the PRA-D, WRAT4, or the (S)PLLT follow the steps below:
1) Register the new session as per normal procedures (i.e., click “Start Testing”, select the PRA/WRAT/(S)PLLT battery, your site, etc.), click “Start”, share your screen to complete the demographic page as per normal procedures (described above) but make sure to stop screensharing right before you submit the information.
a) *Note: for the PRA-D and WRAT4, open the PDF with the list of words (ideally prior to the participant’s arrival).
2) In the next page, instead of copying the link to send to the participant, click “Start” to start the battery on your device, since you will be administering the task.
3) Start screensharing and review the break and welcome pages with the participant. Click “Start”.
4) Introduce the test once you get to the title page.
5) Stop screensharing. For the PRA-D and WRAT4, re-share your screen showing only the PDF with the words.
a) *Note: for the SPLLT and PLLT tasks, you MUST NOT RE-SHARE your screen for these tasks. It is imperative the participant is not pre-exposed to the word list or can observe you scoring the task.
6) Complete the remainder of the task as per standard training procedures.
Once you have completed the proctored test, you will need to register a new session for the participant that has the remainder of the project battery tasks (usually beginning with the Motor Praxis Test). Follow normal procedures as per the steps above.
3.8 Edit Sessions
*This feature is only available to paid users.
On the Edit Session page, you can edit all the information you previously entered at the beginning of the session. This includes Subject ID, Visit ID, Family ID, Local ID, BBL ID (penn-use only), Age, Birth Year, Sex, Gender Identity, Handedness, Education, Parental Education, Assessment Type and if session is excluded.
1. From the top menu on the main page, under “Assessments”, click “Edit”.
2. Select your battery and site from the dropdowns.
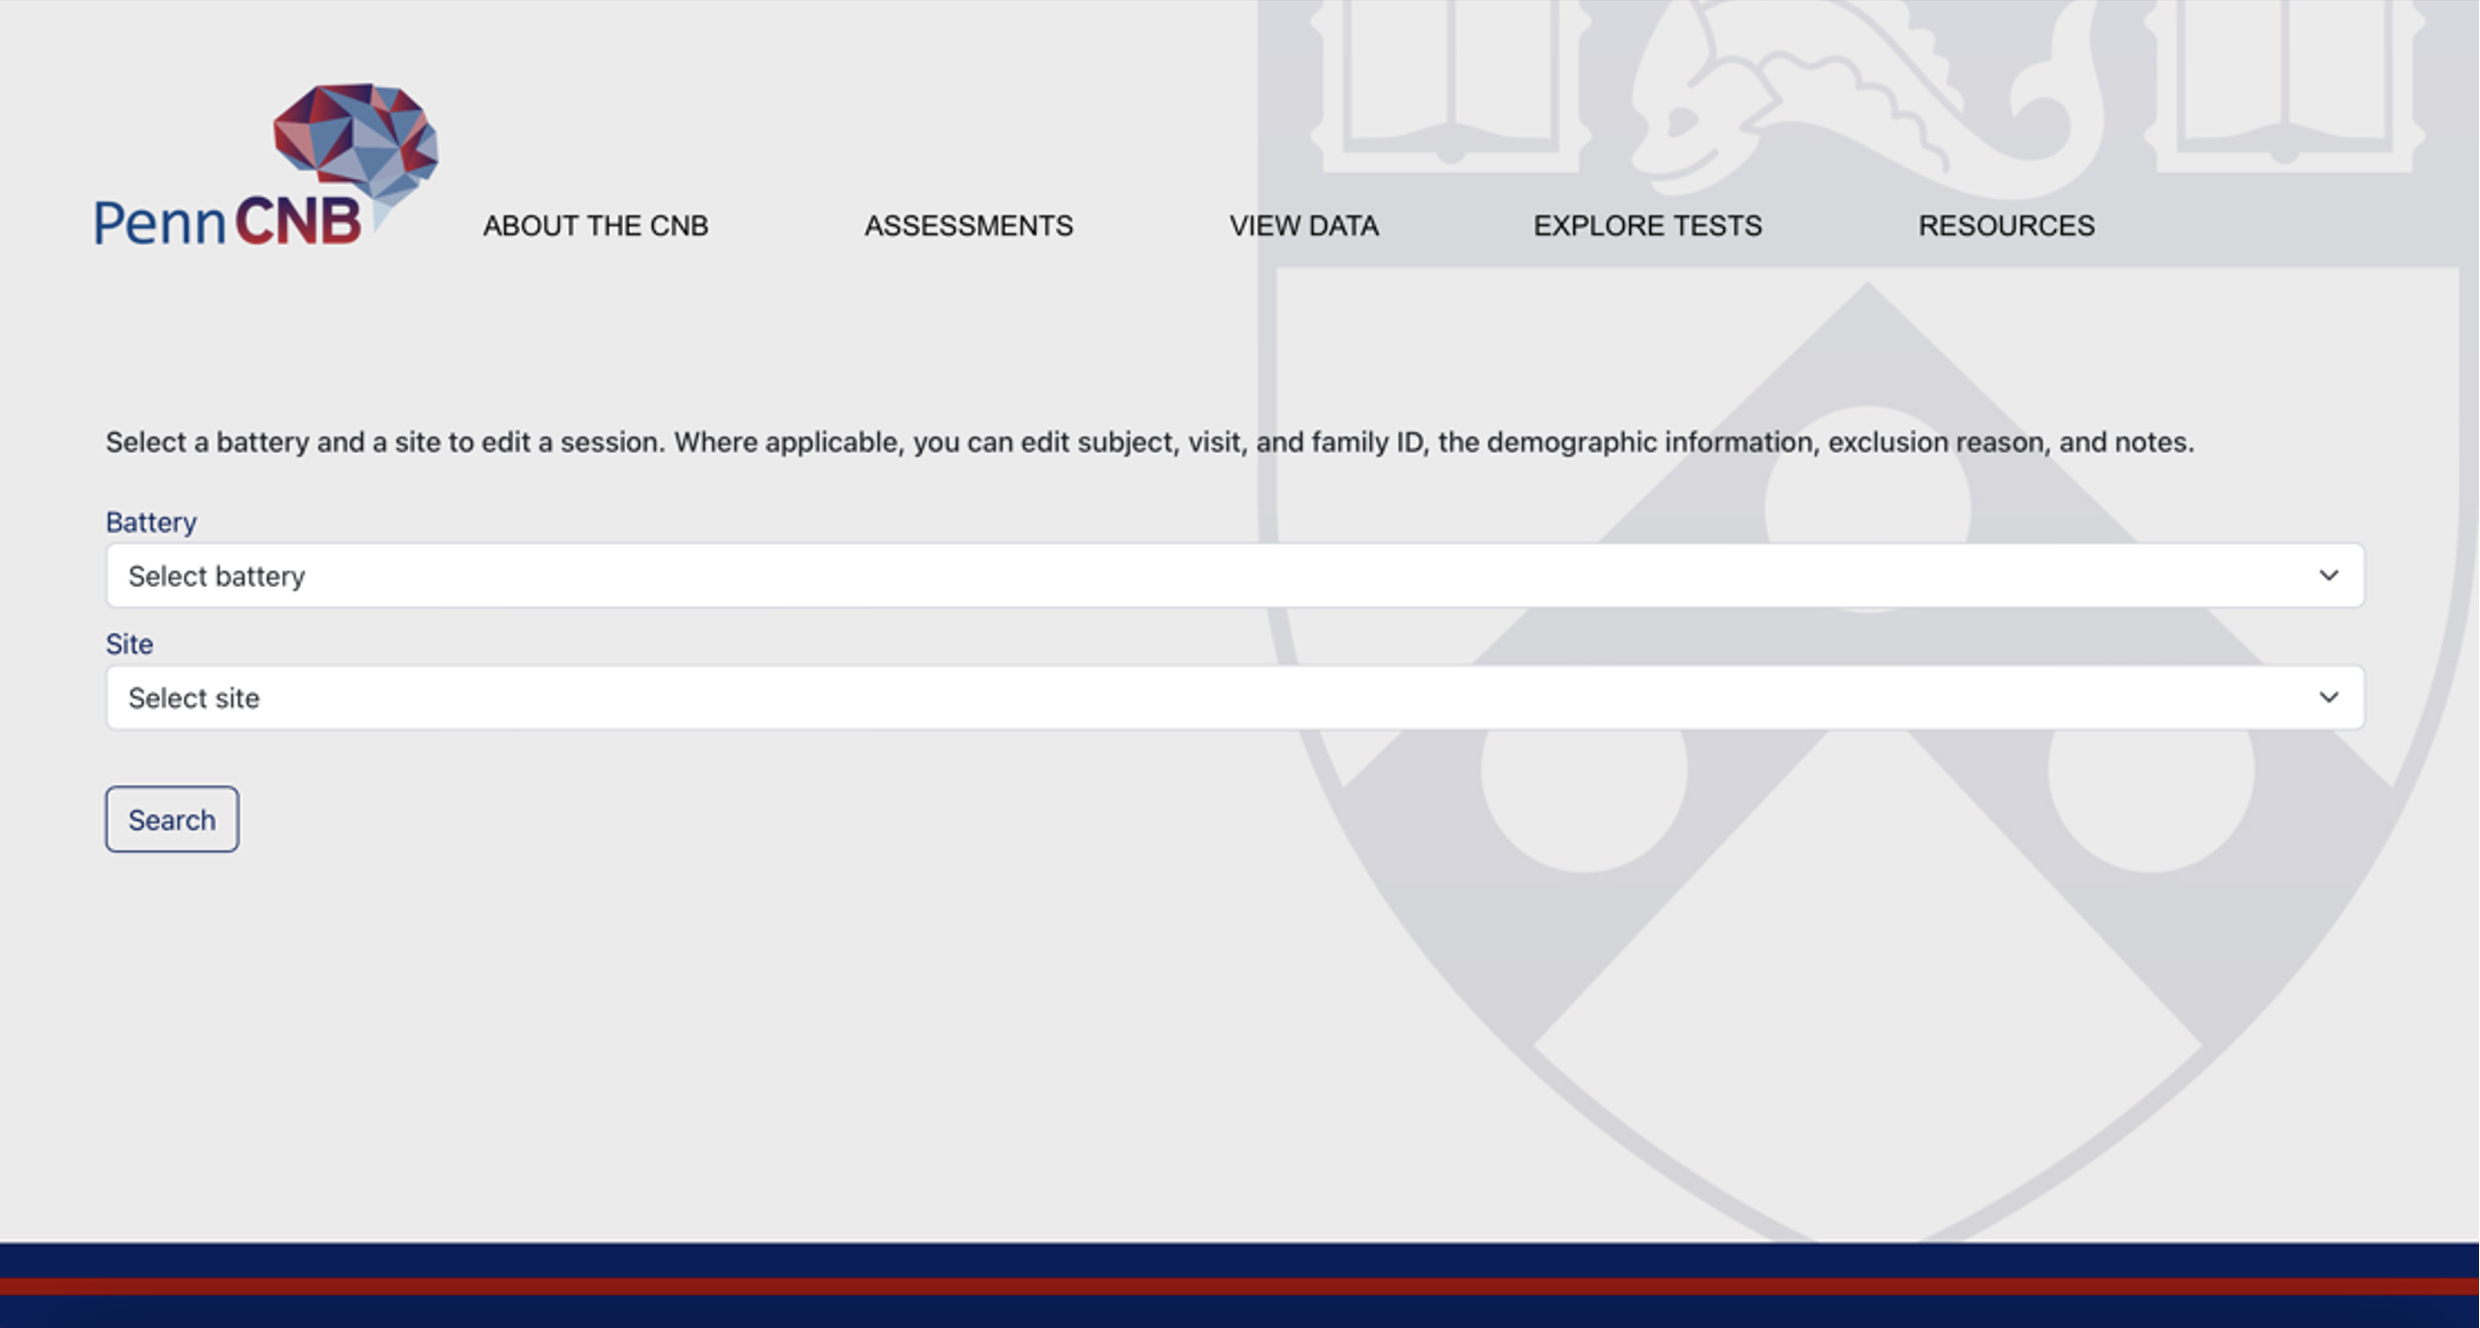
3. Select your session from the list by clicking on the Datasetid box.
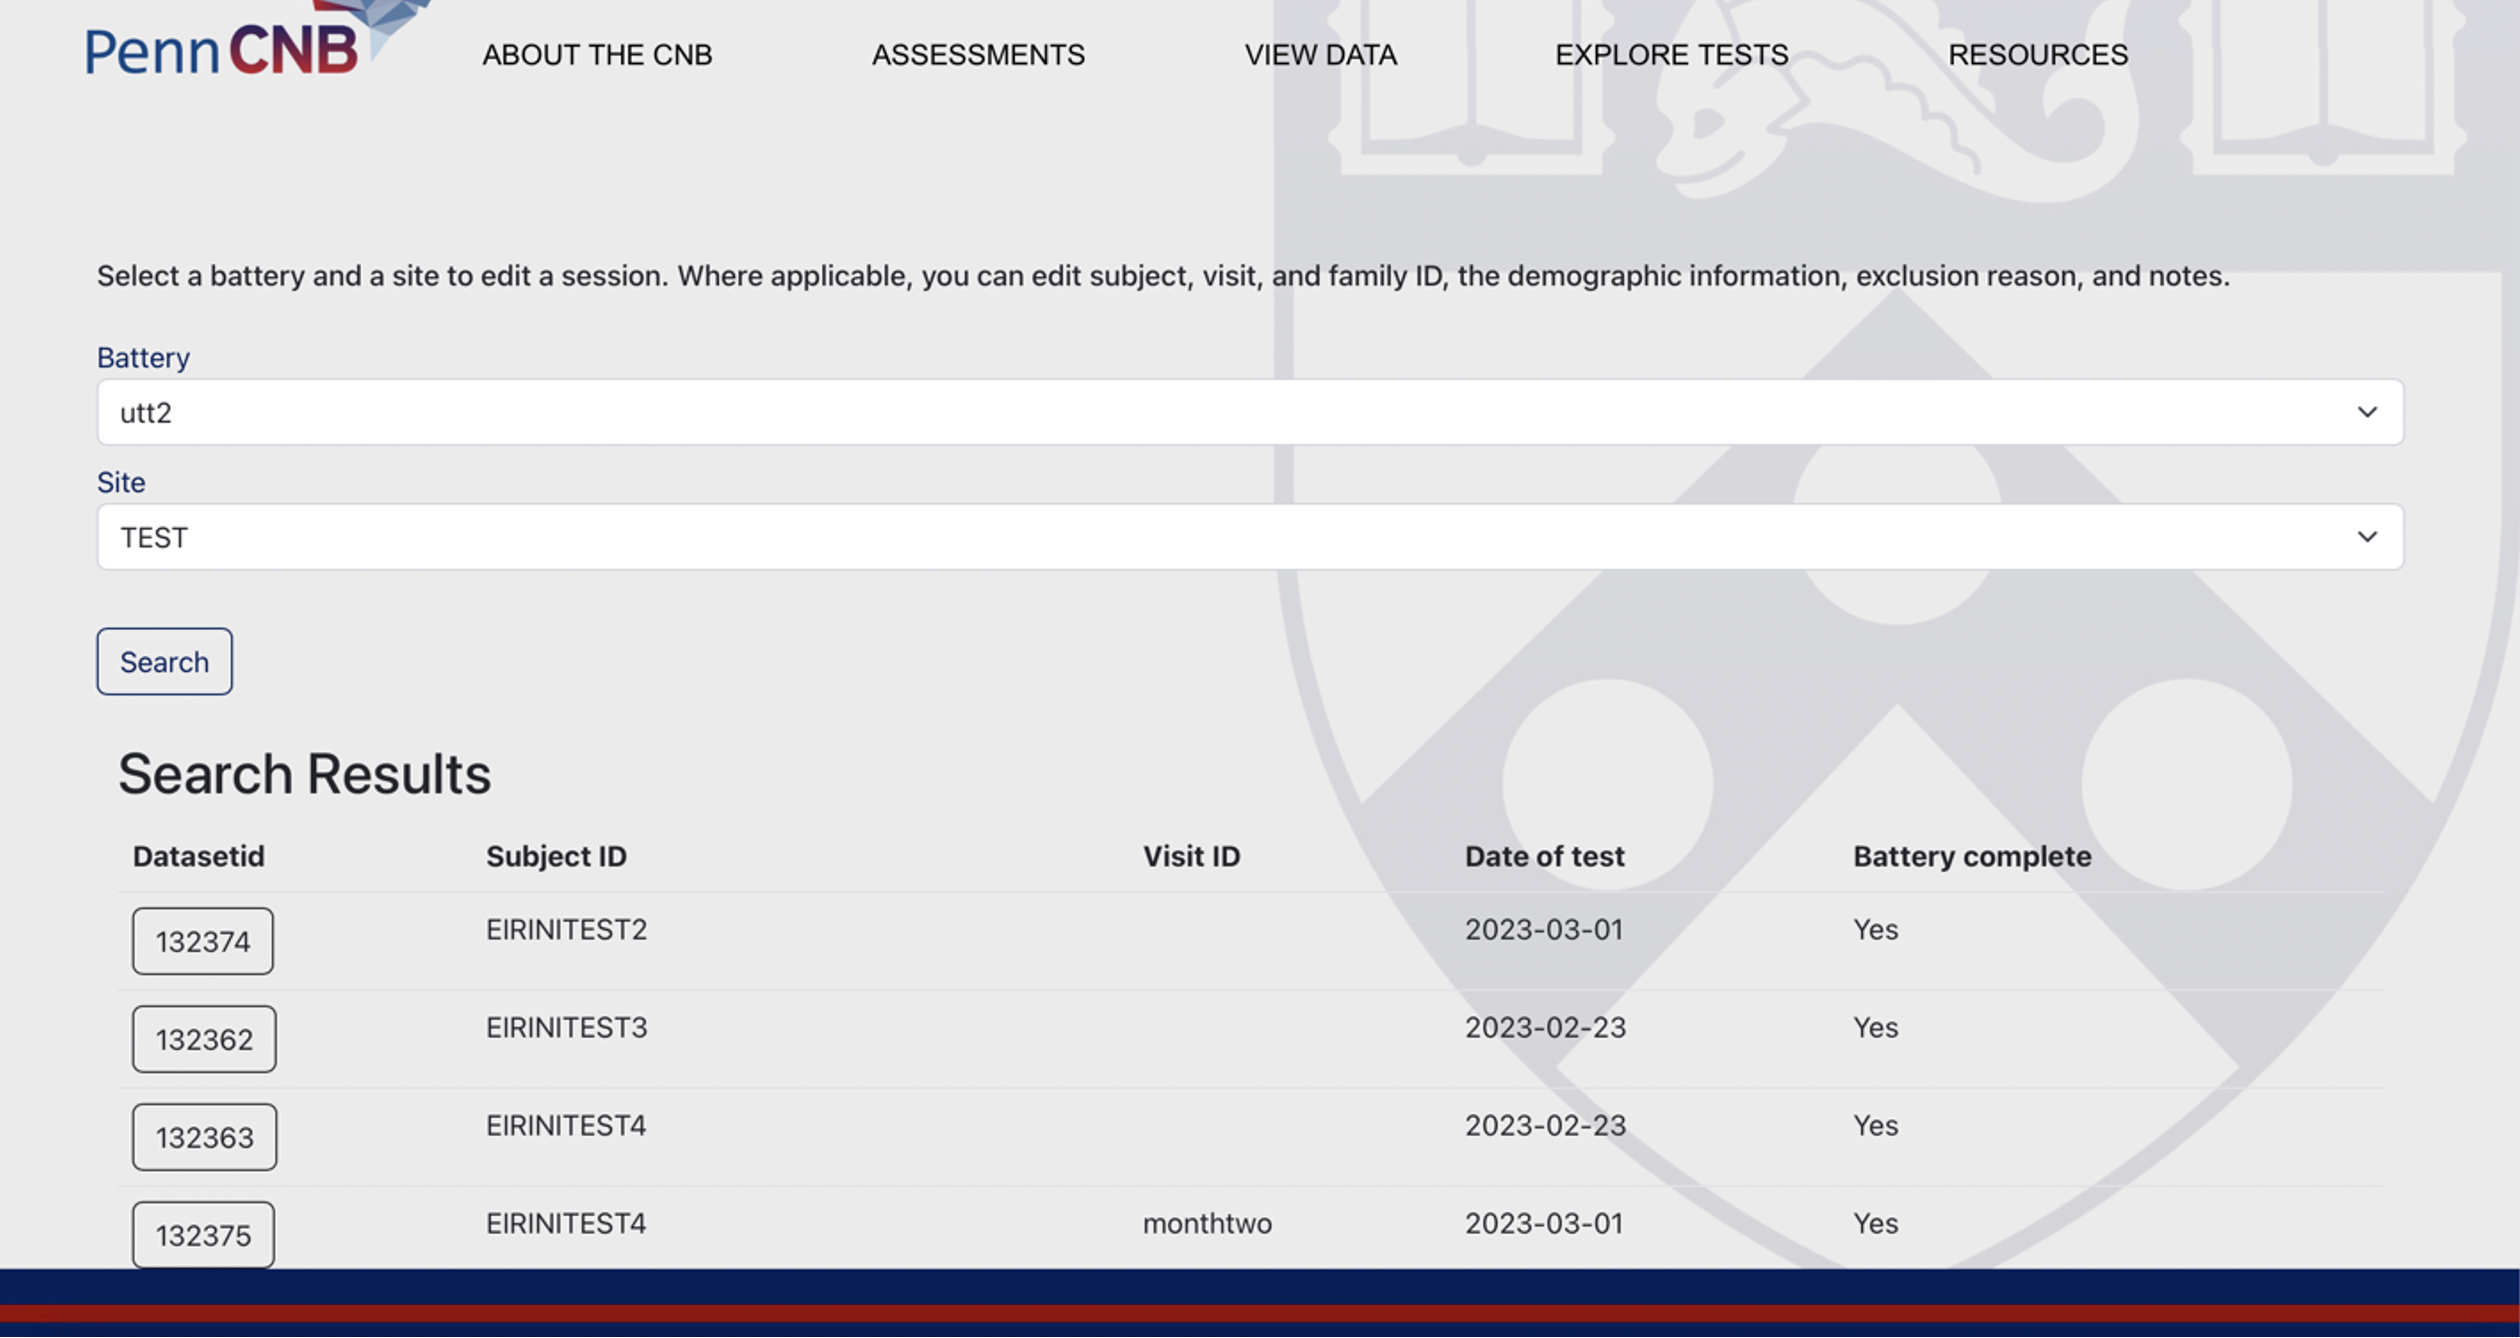
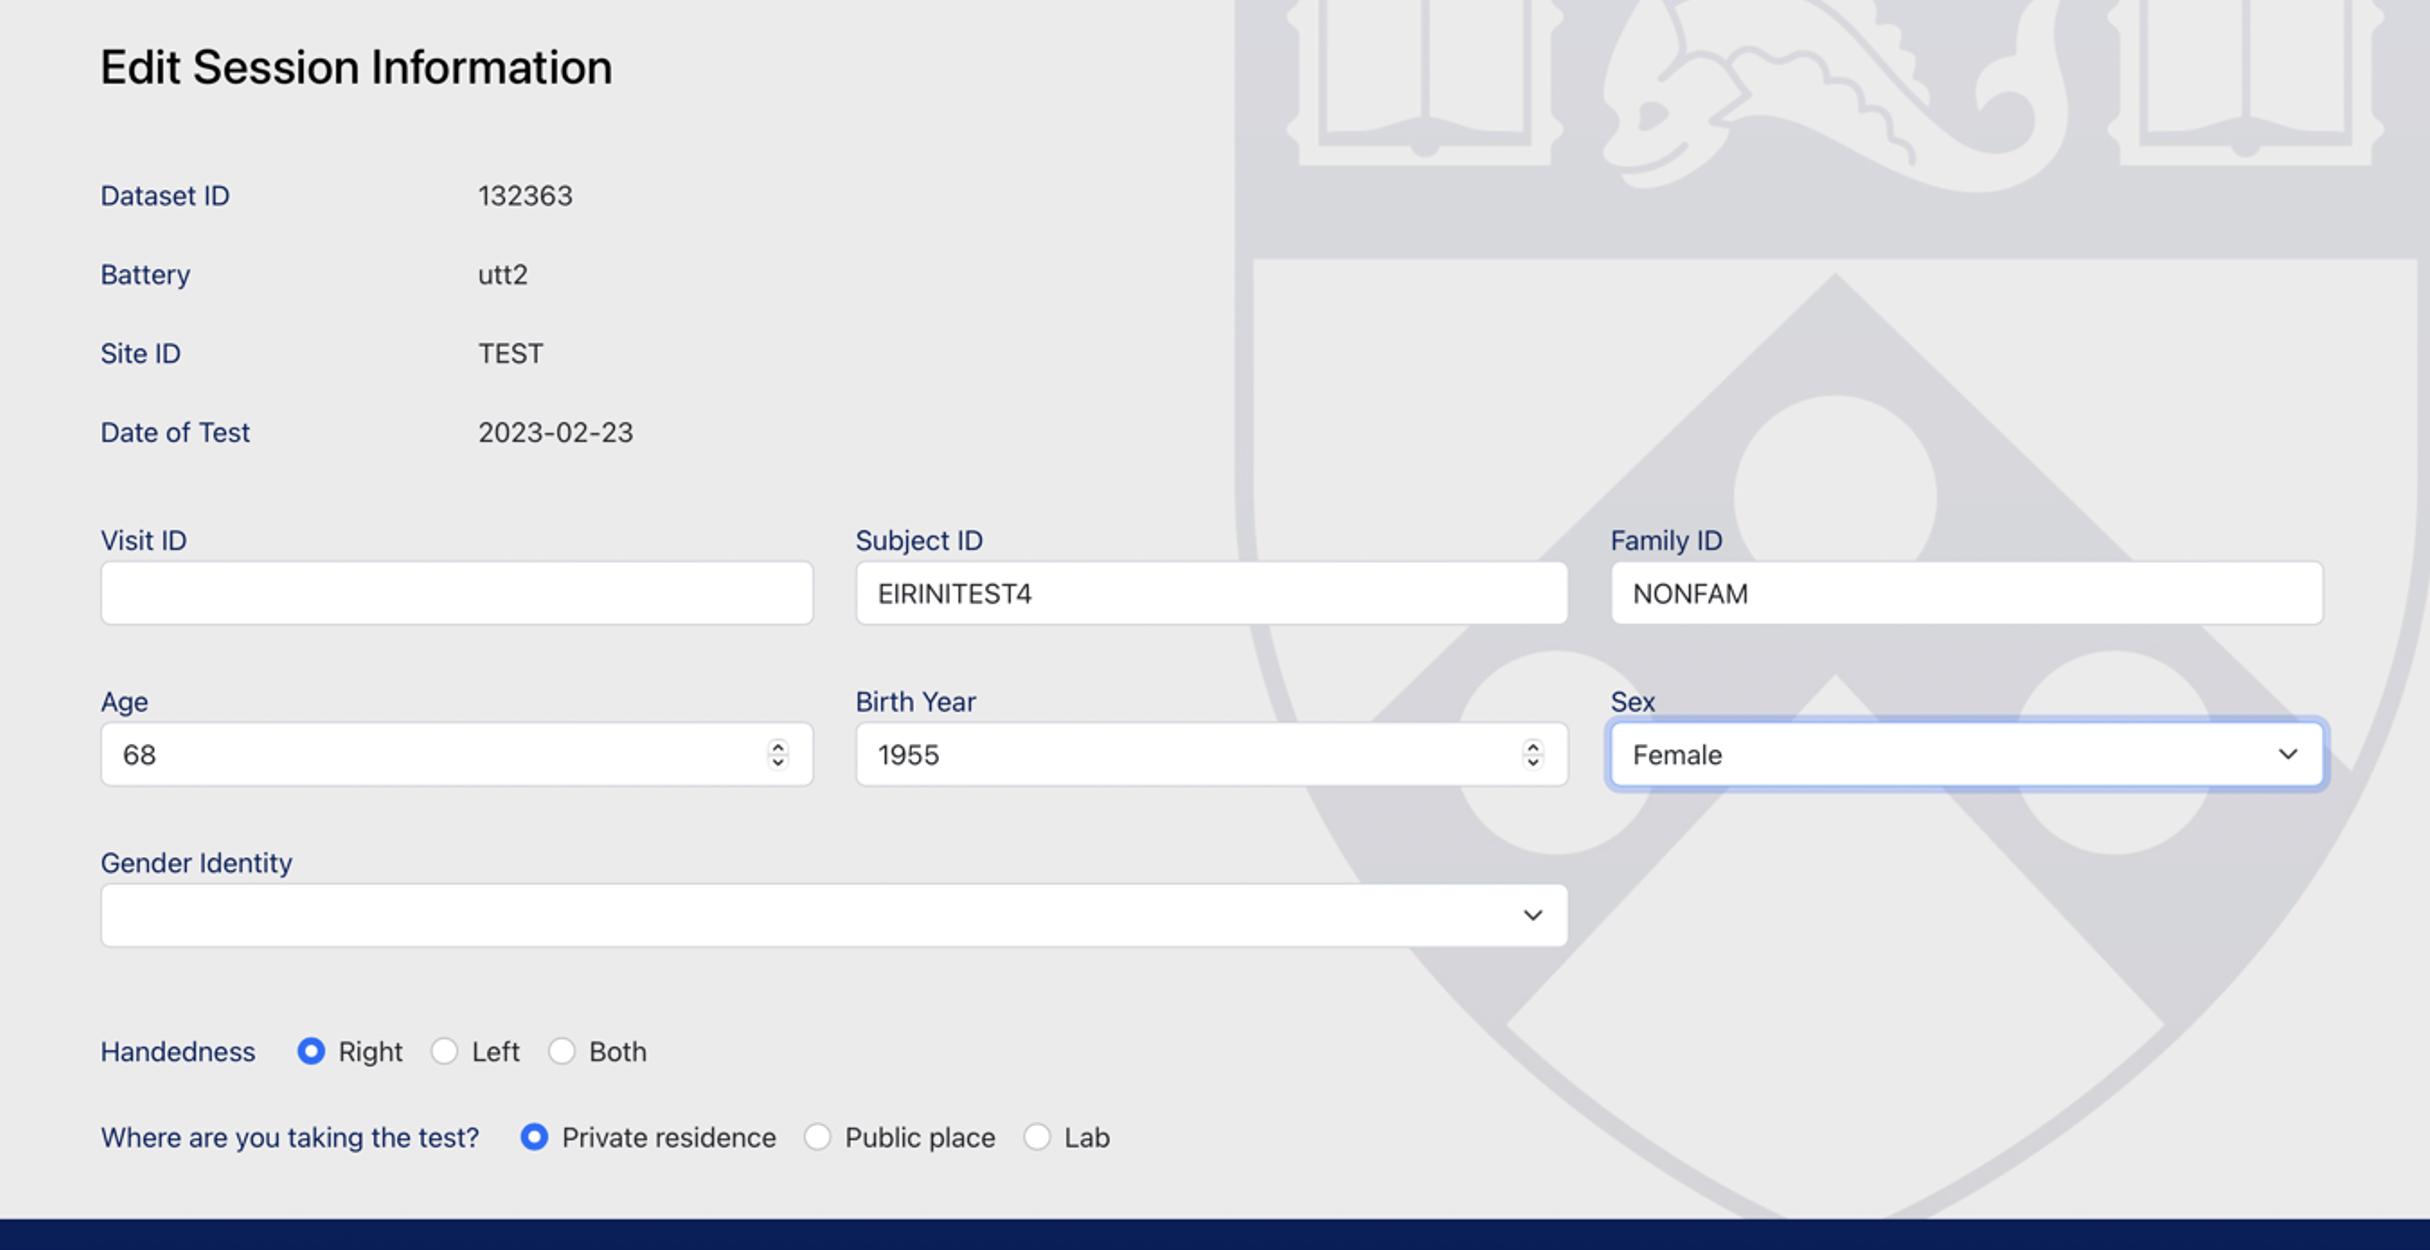
4. The next page auto-populates with the information you entered at the beginning of the visit.
a. You cannot edit dataset ID, battery, Site ID, and date of test.
b. If applicable, you can edit GUID, BBLID, and Local ID.
c. You can edit visit number (only if your study is longitudinal! Otherwise, this field doesn’t apply to you), along with the rest of the demographic information collected at the beginning of the assessment.
d. You can also edit assessment type and indicate if the session should be excluded; if not, leave field blank.
e. The lab notes box is not editable. It just documents any changes you make automatically. Once you edit any of the aforementioned fields and click submit, the change will be visible in the notes box if you enter the edit session page again.
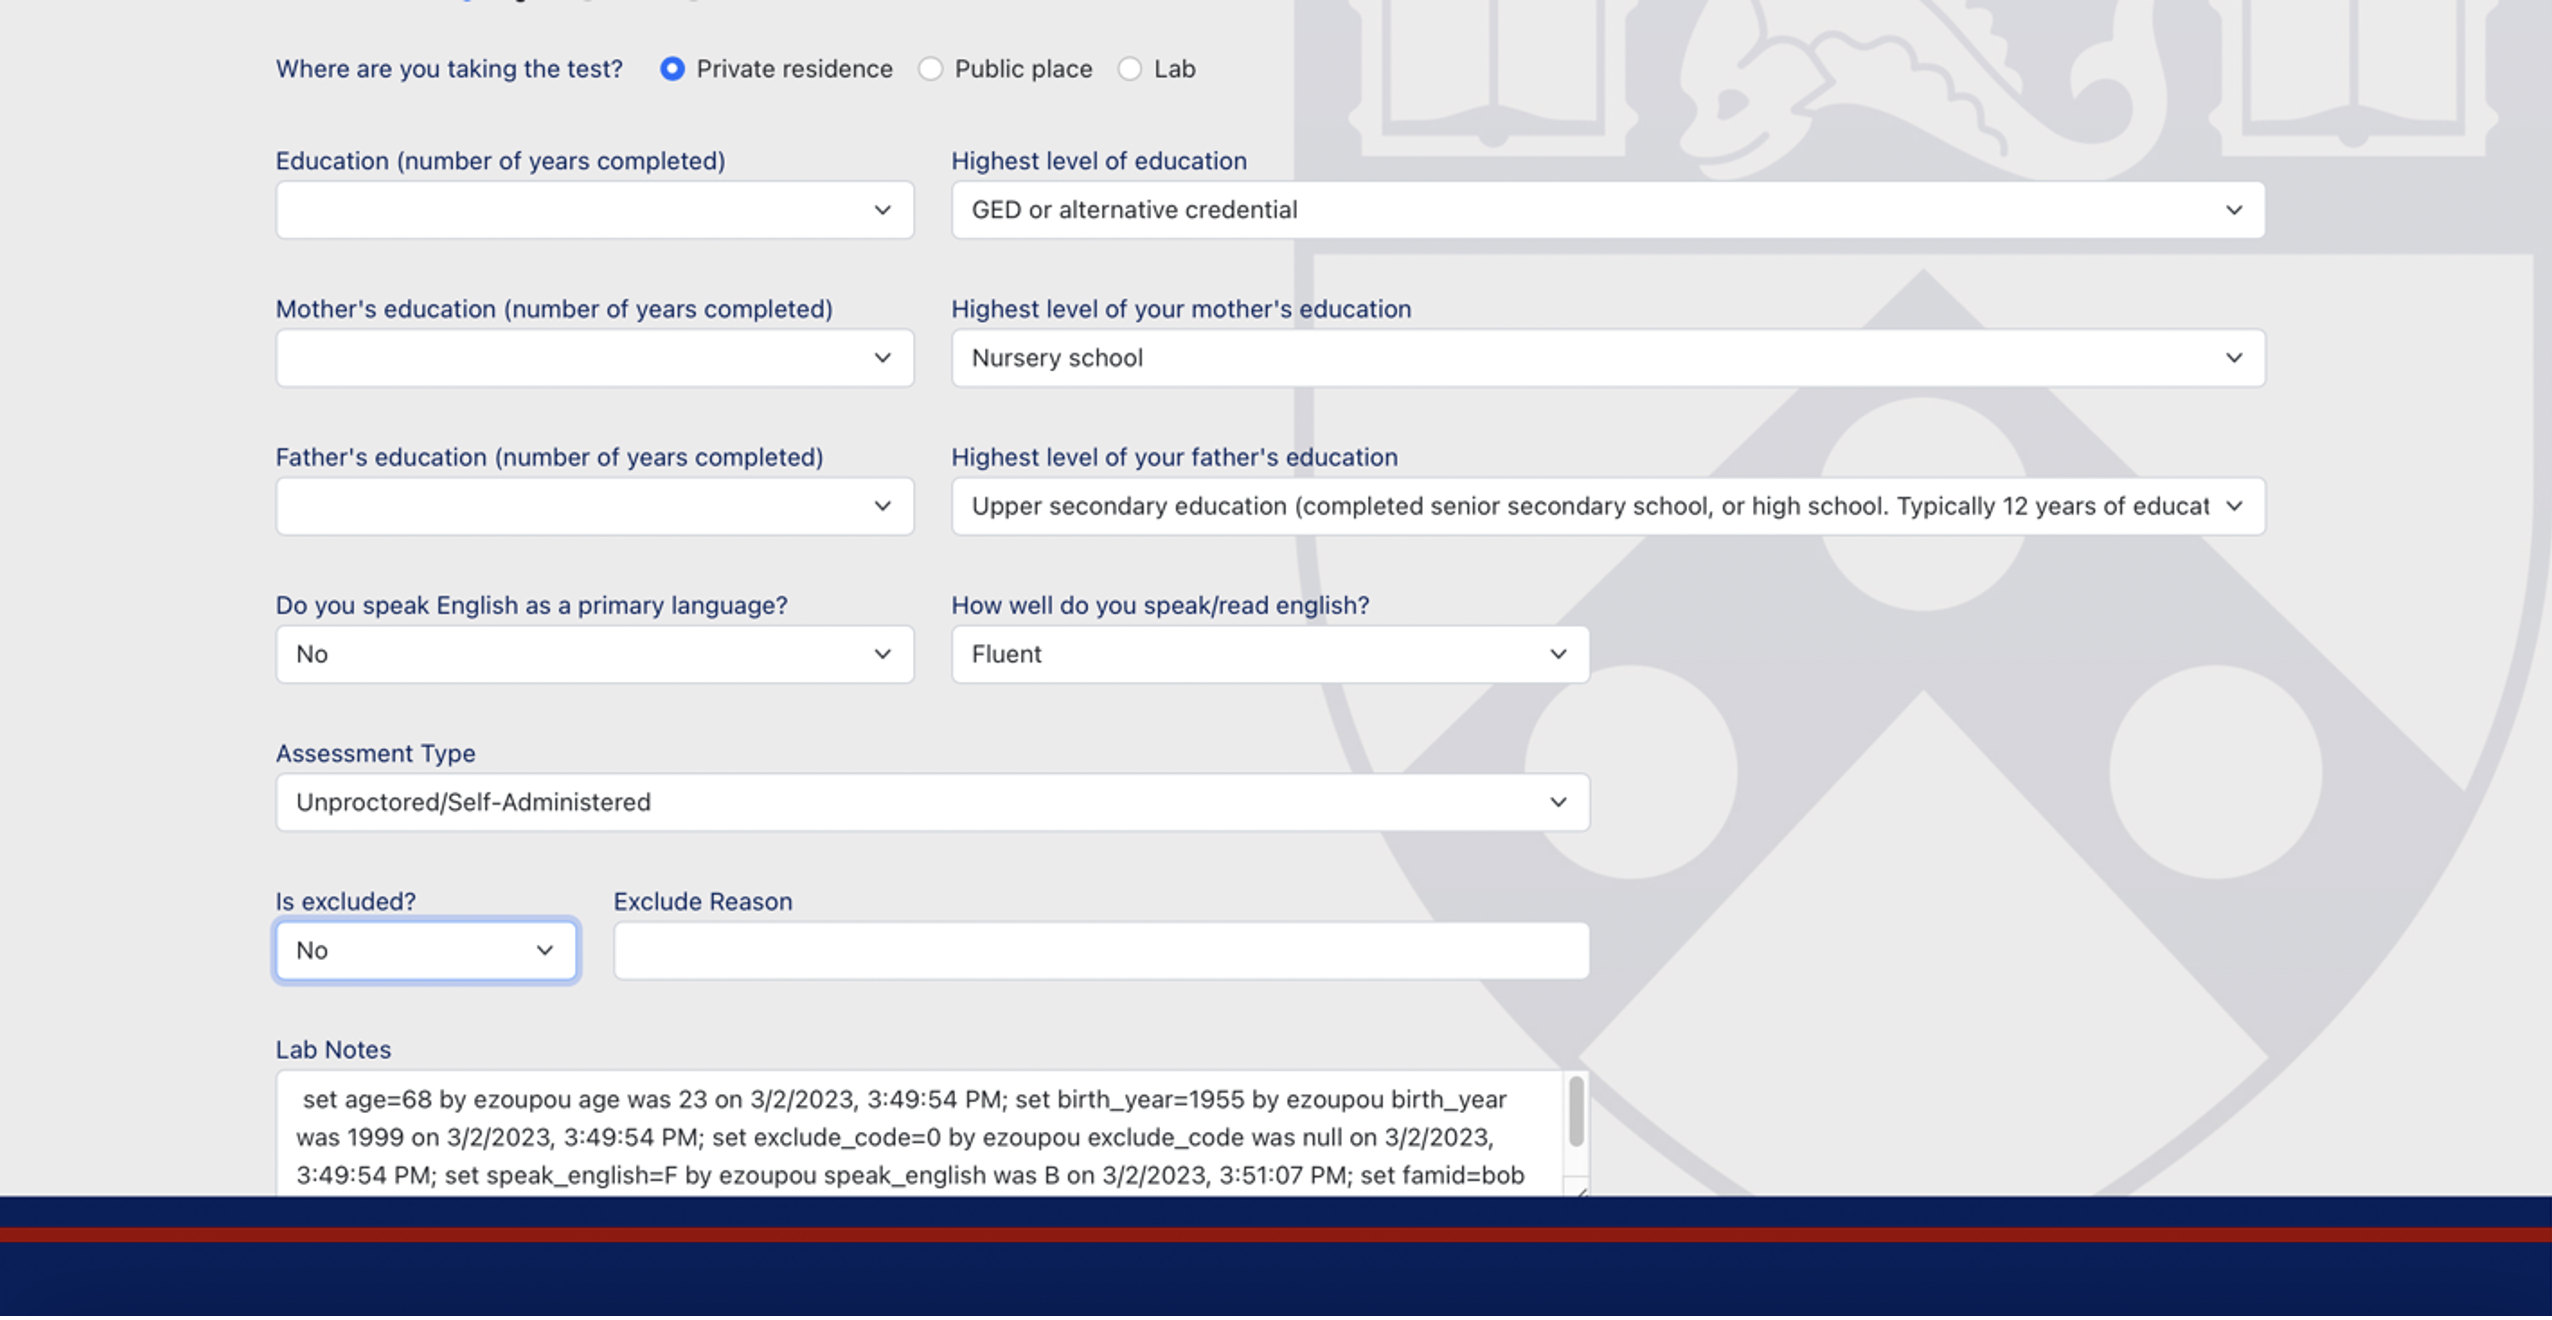
7) Click “Submit” to save your edits, “Cancel” to cancel your edits, or “Back” to return to the search page.
3.9 Exporting Raw Data
There are two ways to obtain your data: our “Reports & Norm Data” application and our “Results” interface.
The “Reports & Norm Data” application allows the user to download summary scores from their raw data as well as normative data. It can be accessed here: https://webcnp.med.upenn.edu/cnb_reports/.
1. From the application interface, select the battery and site ID for which you wish to export summary scores.
2. Click “Generate data report”.
3. Summary statistics will appear below. Click “Export data” to download the summary scores in a CSV.

Norm Data
1) The client only needs to select their battery and click “Generate data report”.
2) A preview of the CSV appears. Click “Download” to export the norms.

3) The CSV contains the normative score for each accuracy and speed variable for each tests in the battery across sexes and ages. Specifically:
a) Title: it’s in the format “age_sex_[across/within]_genus_3_3_[F/M]”
i) “Across” and “within” refers to the test genus (which is like the test version, e.g., ER40-A vs ER4-D). “Across” means that people were normed across all test genuses (aka. Versions), while “within” means that the norm only refers to the specific test version. Sometimes there are no differences between the two, and other times the differences are subtle.
ii) “F/M” refers to “female” or “male”.
b) Genus: test genus is a class/group of task(s) with a definition that uniquely defines it. So, all the tasks that belong to a genus would inherently be the same or have the same characteristics that defines the genus. For example, all the different versions of a task might contain minor differences, but, at the core, they belong to the same genus or class. For example, VSPLOT15 and VSPLOT24 belong to the same genus, VSPLOT, but PMAT and AIM are different tasks, so different genuses.
c) Sex: the sex which the norm number is for.
d) Variable: the variable (accuracy or speed) the norm number is for.
e) Max/Min age: the age range of participants used to create the norm score.
f) N: the number of participants used to obtain the normative number.
g) Mean/Standard deviation: the normative numbers.
h) Norm set.
i) Download Date: date on which the report was downloaded.
Results Interface
This interface should be used to locate your sessions, view raw data, and/or export customized reports, if your require variables that are not part of the standard report described above. If you need additional variables, please reach out to the CNB team.
• Where and When to View the PennCNB Results Interface
o You MUST NOT show the PennCNB Results Interface to any of your participants. When viewing the Results Interface you MUST adhere to confidentiality guidelines determined by HIPPA, your research protocol (IRB), and other regulations passed on by your project coordinator or principal investigator.
o You may log into the PennCNB Results Interface and view the answers for every trial and raw scores for all tasks administered to each of your participants anytime after you complete that specific PennCNB session. These data remain on a protected database, readily available throughout your research study from the moment you submit the PennCNB session onward.
o Make sure to LOG OUT of PennCNB after viewing any data through the Results Interface. Otherwise, anyone with access to your computer will be able to enter PennCNB and view data from any/all of your research participants.
General procedures for viewing/exporting through the results interface:
1. On the home page, under “View Data”, click “Raw Data”.

2. Click on the “Advanced Search (i)” link on the right-hand side of the screen. The "default" is the "basic search" page, but it does not offer enough refinement in terms of what data to search for. Once you select the “Advanced Search (i)” link, that will now be your default search page for any future searches.

3. Select your project Site ID: X (in the example, it's PRACTICE) to find all data for your lab at once.
a. If you are looking for a specific subject, you can search by their Subject ID.
b. You can also search by Dataset ID which is the most specific identifier (i.e., if a single participant is tested multiple times, each of those data records will have the same Subject ID but different dataset IDs).
4. Click/Select the “Include Incomplete Batteries” checkbox (on the bottom of the light green box).
5. Click on the "List Sessions" button on the right-hand side of the screen to pull data.
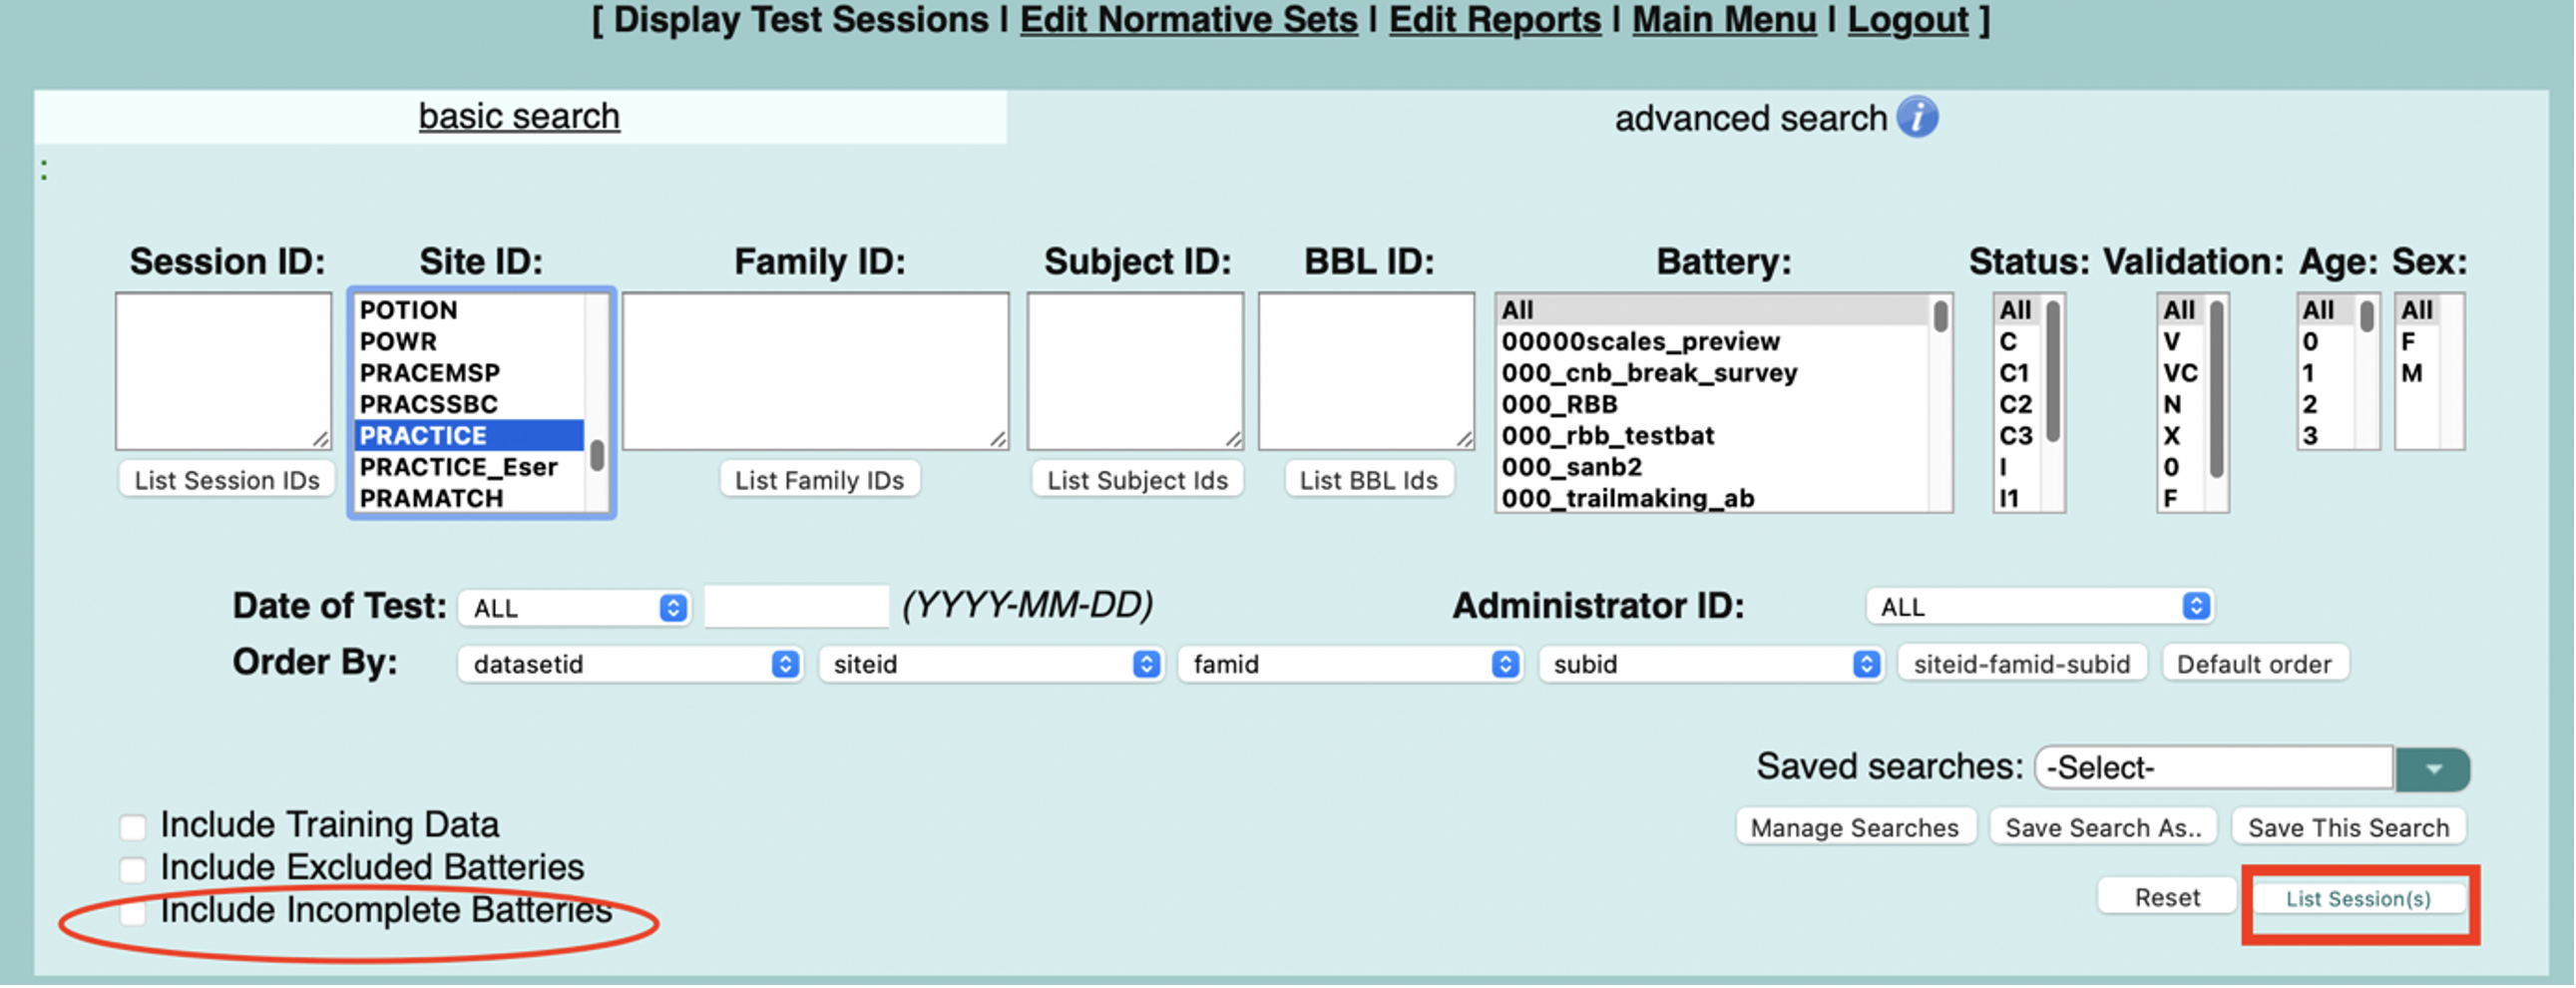
6. Scroll down the page, until you can see the results listed for your Site ID.
7. To export the data:
a. Go to the “Report” field.
b. Choose the report that corresponds to the tests you administered from the dropdown menu.
1. Note: the CNB manager will give you access to your report.
3. Click “Export Report to CSV”.
4. Download your Results and open the file.

Additional Search Criteria
Open boxes/fields
(DSI, Subject, Family, BBLID) These fields are open for you to type the exact ID for each option you specifically selected. As this is an advanced search page, you are expected to know the ID for each field you select as and you MUST write it down in its COMPLETE form.
• Note: Open boxes/fields ARE NOT case-sensitive. Therefore, for a Subject ID = ADMIN_99, you may type in “admin_99”, “Admin_99”. However, you must type the complete ID.
• To search for multiple IDs through the same field: enter all IDs of interest separated by a coma, such as “55555, 44444” as Subject IDs or “NONFAM, FAMTEST” for Family ID, etc.
• To search for a range of NUMERIC IDs in sequence within the same field: enter the first ID followed by two periods/dots (“..”) and the last ID, such as “25..30” for Subject ID or “12222..12240” for Family ID, etc. In these examples you searched for a range of Subject IDs from 25 to 30 and for a range of Family IDs from 12222 to 12240.
• To search for both a range and multiple IDs through the same field: enter the ID search criteria separated by commas, such as “1, 25..30, 43, 50, 101” for Subject ID, etc. Therefore, in this example you searched for four distinct Subject IDs (1, 43, 50 and 101) and for a range of Subject IDs from 25 to 30 through the same field, all at the same time.
o Note: Numeric IDs are the only ones available for searching through ranges. IDs with letters or with letters and numbers (i.e. FS0001, FS0002, FS0003 and so on) won’t be able to be searched by range. Therefore, “FS0001..FS0003” WON’T WORK as a search criteria.
o Although range search option accepts only numeric IDs, it can be used for all ID types (i.e. Site ID, Subject ID, Family ID and DSI ID). The same is true for multiple ID searches, except that multiple ID searches accept numeric IDs and IDs with letters.
Identification (IDs)
• SessionID/ DatasetID (DsID): The unique record of the CNB battery assessment administered. The SessionID and the DatasetID are synonymous. They are sequentially numbered in order of all sessions administered in WebCNP, not by specific projects or battery names. The colloquial name is the “DSID”. A dataset ID is created for a session upon submitting the demographic template, as of June 2023.
• Sub-session: A sub-session is a session in which the administrator begins a WebCNP administration and then quits prematurely. If the administrator does this for a particular subject, there will be multiple sub-sessions.
o This is obsolete as of 2023 because sessions expire after 24 hours. But you may encounter sub-session if you are searching for historical data prior to 2023.
• SiteID: A place in the database, where data are stored for a particular study.
• FamID: For studies that include a family component, a FamID will be assigned to identify each family group. If there is no family component, the FamID will be “NONFAM.”
• SubID: Subject ID.
• BBLID: This is for UPenn studies.
Additional filters
• Battery: The unique CNB battery which includes a predetermined set of tests, in a fixed order. Some batteries may be used across several projects (or SiteIDs).
• Status: The overall battery Test Status Code assigned by the CNB assessor or system upon the completion of a CNB assessment.
o From the menu, select the test status(es) for which you are interested in viewing data. The search will include any session with at least one test with the selected status(es).

o Note: this is based on the old status codes before the June 2023 update. After the update, we updated the codes based on ProctTrack. The codes are now reduced to:
- C1: Good data.
- F: questionable data.
- S: Skipped.
- T: Training data.
- I1: Incomplete.
• Validation: The overall CNB battery validation code assigned to a battery. The final battery validation code may have been automatically generated and assigned by the WebCNP interface OR may have been manually assigned by a CNB validator if it was manually reviewed.
• Age: Value entered in the CNB demographics interface for “Age at CNB”. This is reported in whole years.
• Sex: Value entered in the CNB demographics interface for “Sex”.
• Date of Test: Date of CNB administration.
• Administrator ID: Assessor ID for CNB Assessor. (Ex: Ruben C. Gur is listed as “gur” in the administrator ID dropdown)
• Comment Search
• Include Training Data: Checkbox of whether you wish to include sessions marked as “T” for “Training” as the CNB Status Code.
• Include Excluded Batteries: Checkbox of whether you wish to include sessions marked as “Excluded” by a CNB Administrator (CNB Team).
o This is not advised, however; if you are attempting to locate “missing records”, this may be a reason to include “Excluded Batteries”.
• Include Incomplete Batteries: Checkbox of whether you wish to include sessions marked as “Incomplete” by the CNB interface. This is STRONGLY advised to be included in your search criteria (CNB Team).
Searching by SubjectID / BBLID
One common search within WebCNP is to include every assessment that is associated with a specific Subject/BBLID (or list of IDs), regardless of date of CNB or project/SiteID. Please note, if you are including more than one SUBID/BBLID in this search, the WebCNP interface will not date-match. The steps below provide an example of how to execute this search:

1. If you have not already set and saved your default search interface to “Advanced Search”, click on the “advanced search” link.
2. Make sure “All” is highlighted in the SiteID field.
3. Enter all of the IDs you want to search for in the Subject ID or BBL ID fields.
4. Make sure “All” is highlighted in the Battery, Status, Validation, Age and Sex fields
5. Select the check-box for “Include Incomplete Batteries”
6. Click the “List Session(s)” button

7. All CNB assessments which match the criteria above will be listed in the search results table. The total number of sessions found will be displayed next to ‘Total found:’ above the listed sessions.
8. There are navigation buttons, also at the top to the listed sessions.
a. |<< First page
b. < Previous Page
c. > Next page
d. >>| Last Page
e. Page: [text field] – Jump to page. Current page
i. As shown above, the variables listed in the search query are: V (Validation Status), DSI (dataset id), Site ID, Family ID, Subject ID, BBLID, Local Subid, Battery, Last Administrator, Start Date, Sess (Sessions number), BC (battery complete?), UL (battery uploaded?), Admin Comments, Lab Notes.
ii. Each row corresponds to a single record.
iii. Sess – corresponds to the number of times the same battery has been administered to the same participant at the same site.
iv. Click the V button, to view validation information such as Valid Code, Validator, Valid Date, Valid Comments, Errors Reported (by the WebCNPTM system).
9. Click the View button in the first column, to go to the Sessions Information page.
a. From this page, you can view all the demographic and test session information, including Subsessions information and Additional Notes.
b. In the Additional Notes text field, you can view notes and comments that were recorded during testing in the top text field. To add additional notes, enter text into the bottom text field. Once additional notes are added, click the Update Admin Comments button.
10. To view the actual test responses and response times, click the Display Test Responses link at the top of the page. To view test scores, click the Display Test Scores link at the top of the page.
a. Initially all responses/scores will be displayed. Select a specific test from the Test: drop-down menu and then click the List Responses/Scores button to the right.
11. Click the Display Test Session Information link to return to the Sessions Information page.
12. When you are ready to export your data, select your report from the “Report Options for Exporting Test Scores” dropdown menu (see below sections on Reports for details on reporting options).
Search for Subjects based on SiteID
Searching only by selecting SiteID will allow you to see all records administered within that SiteID. An example of this would be to see all records within the EONS SiteID to see all the State-Trait Anxiety Index (STAI) results for the GO1 participants collected at the scanner.
In this example, you could select the EONS SiteID and leave the Subject ID and BBLID fields blank, to see all the recorded that were administered.

How to Search for Subjects based on SiteID and Battery
Another common search within WebCNP is to search for a specific list of BBLIDs, but to only export records where the BBL Common Battery (versions 1 or 2) was administered, across projects within the lab.
For example, you could enter the list of Subject IDs and select all the SiteIDs (projects) and the specific batteries in question. You can hold down the Control button and select multiple batteries or SiteIDs. Make sure to select “Include Incomplete Batteries”.
In the search below, only records administered within the “BBLBRAIN” or “BBLPILOT” SiteIDs and include Subject IDs “23232”, “99999” or “04566” and used CNB Battery versions “BBL_BATTERY_v1” or “BBL_BATTERY_v2” will be displayed.

Remember: The more search criteria you add to your query, the more specific your results will be.
CNB General Guidelines
Read ALL Instructions Out Loud
You MUST read the instructions for each test to the participant EXACTLY as they appear on the computer screen, even when they are capable of doing so. You can explain this procedure to the participant before starting the first task by saying: “It is part of the study that I read the instructions out loud to you, even though you may be capable of reading them yourself. This is so that the research is done in a standard way across all participants and so that you receive the same administration as everyone else.”
Answering Questions About the Instructions
Paraphrasing instructions is allowed. Nevertheless, DON’T cue the participant to a better performance by giving away the answers or a strategy to take any task. Essentially, you may NOT say or confirm anything that is not stated/implied by the instructions. Therefore, NEVER tell a participant the test will be easy, how many questions there are, how similar it might be to a previous task or how long it will take unless this information is in the task’s instructions.
Answering Questions About Practice Trials
You may clarify the instructions to the participant during practice trials. You can confirm how the participant should respond (i.e., on the motor praxis test, you may explain that the participant needs to click on the green box once and continue to do so until the practice is over) or correct the participant if they are using the wrong response input (i.e., using the mouse incorrectly, using the spacebar when the mouse should be used or vice-versa).
Note: Do not ever tell the participant the correct response during a practice trial or test trial.
Do Not Read Test Items to the Participant
You must not read the test items for the participant in any task. All questions or doubts are to be resolved during the instructions prior to the beginning of the test trials. Right before the test trials begin, the participant should be the one making the preliminary mouse click or spacebar press to begin the task and you should then be in the observation position, so you can take notes about the testing session without distracting the participant.
Answering Questions During Test Trials
You may only answer questions the participant asks during test trials that have to do with instructions and only in between different sets of test trials. For example, in a sensory-motor skills task measuring dexterity, you may remind them which hand (dominant vs. non-dominant hand) they should use for the next trial. Another example is to clarify during an emotions rating task that the participant task is to click on the emotion they think the face on the screen is showing. Essentially, you should wait until the participant is done responding to the trial or block of trials before answering a question or you may reply as briefly as possible if there are no breaks in between test trials. In any event, never state more than what the instructions have provided.
Answering Performance Questions
In the beginning of the WebCNP (CNB) administration, you can ease the participant’s anxiety towards taking The CNB by saying “Some tasks are going to be harder than others. It is like that for everyone. Just try your best in each of them”.
If the participant asks about their performance or if you realize they might be getting frustrated or tired, the standard incentive is: “We appreciate your effort” or “You are doing well. Thank you. Please just try to be as fast and as accurate as you can”.
First CNB Task
One of the first CNB tasks is usually the “Motor Praxis Test”:
This task is designed to measure a participant’s sensory-motor skills as well as their ability to use the computer mouse, which is the response input tool used in almost all CNB tasks. Only a few tasks will require the participant to use the spacebar instead of the mouse to enter responses.
With this in mind, the Motor Praxis serves as a “gateway task”, allowing the administrator to know whether or not the participant will be able to do the tests in their battery. Therefore, if you are not administering the “Motor Praxis” as your first task, please make sure the participant is capable of using the computer mouse and keyboard spacebar. If a participant can’t use these controls, they should not be administered the CNB. You may help them familiarize themselves with the mouse, but once they have practiced, the participant must do this task on their own.
If a participant can’t complete the mouse practice or is not capable of controlling the mouse, all CNB tasks he or she take are likely be compromised. Therefore, the CNB battery should not be administered.
Standard Responses
• Do you have any questions?
• I cannot answer that, but just keep trying your best.
• You are getting through the test just fine.
• You did a great job completing that.
• You’re putting good effort in the tasks.
• Try to work as accurately and quickly as you can.
• Some tests may be more frustrating than others; just keep trying your best.
• Just __ more tasks until we can take a break, if you want one.
Skipping Tasks
For Mac computers, press the command and period keys simultaneously; for all other computers, press control and period.